A small, lightweight alcohol stove can be made from two soda cans and,
in this design, two screws. I've used it while burning methyl hydrate,
more commonly known as methanol, which is available in hardware stores.
Below I'll show you step-by-step how to make it, both on this page
and in a video below.
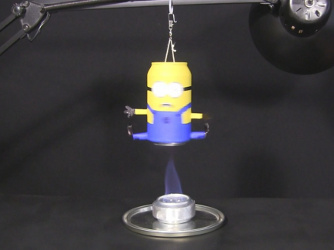
In the photos below you can see the alcohol stove but you can also
see that I was using it to make a minion spin as a
Hero's steam engine,
also shown in the video
below.
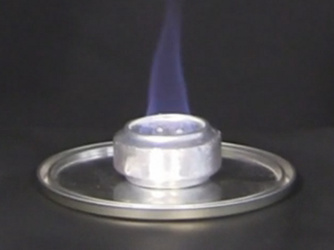
Homemade/DIY alcohol stove.
 |
|
Alcohol stove making minion spin.
 |
|
How to make an alcohol stove
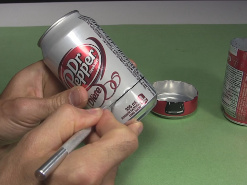
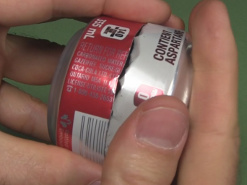
Get two soda cans.
Draw a line around them both
at least 1 1/8" or 3 centimeters from the bottom.
Cut the bottoms away from both.
Do this gently so that you don't bend the sides and create dents.
You want the sides to be smooth, well rounded.
1. Get soda cans.
 |
|
2. Draw a line.
 |
|
3. Cut the bottoms.
 |
|
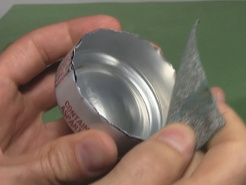
Sand the top edges so that
they're easier to work with. Again, be gentle since we want the sides
to be smooth, well rounded.
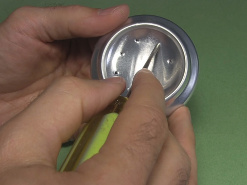
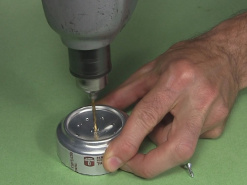
Select one of the can bottoms
and poke small holes where the flames will come out. I'm using a hand
punch for this, but use whatever
you have available. The sharp point of a compass (the tool for drawing
circles) will work for example. You could also drill them with around
a 1/16" drill bit. In my case I did it in the center area of the
can and I made eight of them. That's because I wanted the flames
to be in the center since I was making it to power a
Hero's steam engine
(see the video
below.) Most people put the holes on the outer edge, as illustrated
below since they're just using it for cooking purposes and the bottom
of their cooking pot is larger than the stove.
4. Sand the top edges.
 |
|
5. Make flame holes.
 |
|
Holes on the edge instead.
 |
|
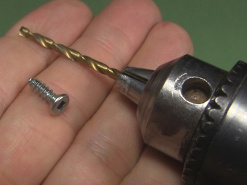
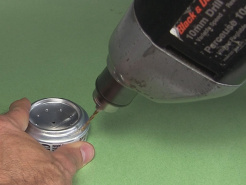
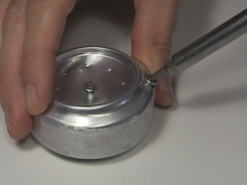
Drill a larger hole in the
center for filling the stove with alcohol. After filling, you'll be
plugging the hole with a screw so make the hole the right size for
whatever screw you have.
If you're putting the holes
for the flames to come out of in the center area of the can like I
did in step 5 then drill another hole at the edge. If you're putting
the holes on the outer edge instead like I also talked about in step 5
then you probably don't need this other hole. Its purpose is for
air to escape while filling the stove with alcohol.
It can be the same size as the fill hole. A screw will be
plugging this one too after you've filled the stove.
6. Drill the fill hole.
 |
|
The right drill for the screw.
 |
|
7. Drill an edge air hole.
 |
|
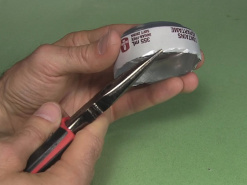
Bend the edges of the can that
has the holes you made. Bend only near the edge, making sure to leave
a lot of the side smooth and well rounded.
Insert the can with holes in
it into the other can. This is hard to do since they're both the same
size. The goal is to have one inside the other but with as much of the
sides smooth and well rounded. If you have dents in the sides then
the flame will come out of the upper edge where the dents are.
Some try putting the can with holes in it in the freezer for a few
minutes to shrink it, and even heat up with can with no holes in it
to grow it and then put them together. If it works for you
then great. It didn't work for me.
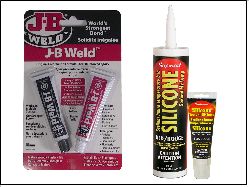
One trick, that I didn't do, is to first put a high temperature
sealant around the side of the can that has holes in it first, and then
put it in the other can. That will tollerate dents better. Since I
didn't do this, I had to make a few of these before being successful.
Examples of some sealants are:
- JB-Weld,
- high temperature silicone,
- high temperature gasket sealant.
8. Bend the edges.
 |
|
9. Insert one can into the other.
 |
|
Some sealants.
 |
|
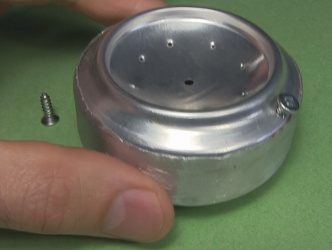
And now you have your finished alcohol stove. You can see that I
also sanded away any branding leaving a nice metal looking finish.
Finished alcohol stove made using soda cans.
 |
|
Lighting the alcohol stove
Lighting the alcohol stove isn't easy. That's because it burns on the
fumes coming out of the flame holes and not on the liquid fuels inside.
This causes it to burn longer than it otherwise would. Mine burns for
around a half hour. The fumes are a result of the alcohol being heated.
But to get enough fumes you first have to heat up the stove and
that takes a few minutes.
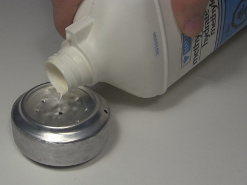
With no screws in either
the fill hole or the edge hole, pour your alcohol in. In my case
I used methyl hydrate (methanol), a type of alcohol, from a hardware
store. Rubbing alcohol doesn't work well at all. If fuel starts coming
out of the fill hole then you've put too much.
Plug the fill hole and the
edge hole by putting in the screws.
Make
sure there is no flame before doing this step. There won't be
any flame
the first time, but this step will be repeated a few times. I check
by looking first and then putting my hand over the top to feel for
heat. When you're sure there's no flame,
pour more alcohol in the center. Due to surface
tension due to the small size of the flame holes, the fuel will not
go into them. Don't overflow the center area.
Notice in the photos below that I put a metal tray underneath since
the stove will get hot and I don't want to damage the table. In my
case the tray is simply a paint can lid.
1. Fill the stove with alcohol.
 |
|
2. Plug the holes.
 |
|
3. Fill the center with alcohol.
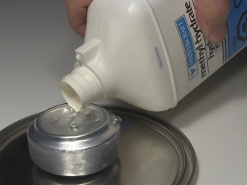 |
|
Light the fuel in the center
area. The purpose of this is to heat up the metal of the stove and,
indirectly, to heat up the fuel inside so that fumes start being created.
Using a lighter to heat up the side of the stove can also help to speed
up heating.
In the photo below you can
see individual flames coming out of the small flame holes. In this
case they also combine to make a bigger flame since they're so close
together. This is the goal. But it won't happen right away. If the
flame simply goes out then make sure the
flame is out and then go back to step 3.
If you do get individual flames then the stove is lit and will stay
lit for around a half hour if it's the same size as mine. In my case
I have to go back to step 3 around six or seven times before I get
the individual flames.
4. Light the center area.
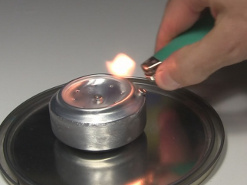 |
|
Heating the metal directly.
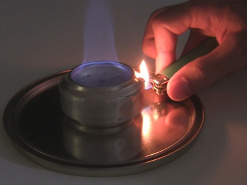 |
|
5. The individual flames. Success!
 |
|
In this video I show step-by-step how to make the alcohol stove, followed
by some fun using it to make a minion spin as a
Hero's steam engine.

