|
|
|
An example calculation to aid the adjustment and testing of the protecting corona-rings in a specific HV probe
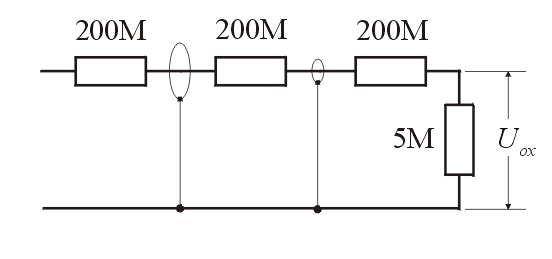
A sample HV probe has been designed and built by Steven Dufresne to handle max. 150 kV input voltage. The HV probe is made of a 5M output resistance (10M resistor in parallel with the 10M inner resistance of the digital multimeter), and 25 pieces of 200M resistors (not all shown in the figures) of the type MX440 from CADDOC Electronics, each having a max. voltage of 11 kV. This design is not ideal, but it serves learning and experimental purposes.
According to the specification of the DMM the max. allowed voltage on its probes may not exceed 1000V. Steve decided not to allow more than 950V at the output Uox. Our task is to create and test protecting corona rings around the leads of certain resistors. If the 200M resistors at the HV side of the probe would breakdown and be shorted then the corona ring should attract a spark to the ground to prevent the rise of the output voltage above 950V, and thus protect the instrument.
The protecting ring or rings can be placed around the resistor lead between the 5M and the last 200M resistor, or better between the 200M resistors one or two stages before that point. Steve has chosen to place two corona rings, at two places as shown on the figure below. How can we make, adjust and test these rings so that they should be activated at the appropriate voltages and provide reliable protection? The following calculation is meant to aid the adjustment.
Since the allowed max. output voltage is 950V, the allowed
max. current is: ![]() . However this current would create a voltage
drop of
. However this current would create a voltage
drop of ![]() on a single 200M resistor, which exceeds the
maximally allowed 11kV for those resistors. Thus the allowed max.
current may be not bigger than what creates the 11kV voltage drop
on the 200M resistors. If we would allow it to be bigger then all
the resistors would break down, and the HV might reach and spoil the
instrument at the output. Thus the max. allowed current according to this
condition is
on a single 200M resistor, which exceeds the
maximally allowed 11kV for those resistors. Thus the allowed max.
current may be not bigger than what creates the 11kV voltage drop
on the 200M resistors. If we would allow it to be bigger then all
the resistors would break down, and the HV might reach and spoil the
instrument at the output. Thus the max. allowed current according to this
condition is ![]() . We take the practical max. current to be
somewhat less and a round number of
. We take the practical max. current to be
somewhat less and a round number of ![]() . This can
create a maximal output voltage of
. This can
create a maximal output voltage of ![]() that
corresponds to 250kV max. input voltage at the HV end. This is a
good value since the probe was designed to measure max.
150kV.
that
corresponds to 250kV max. input voltage at the HV end. This is a
good value since the probe was designed to measure max.
150kV.
Now we can calculate the max. allowed voltages at the points 1 and 2 in the figure below, where the rings are located
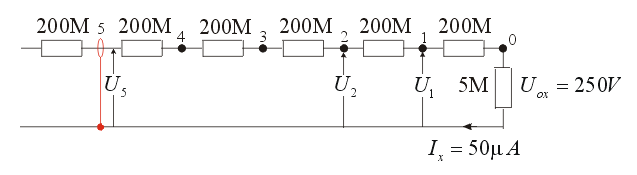
![]() and
and ![]() . We can take the rounded practical max. values
of 10kV at point 1, and 20kV at point 2. The
function of the corona rings is to prevent the rise of the voltage at
these two points above these max. values by creating a spark to the
ground. Now the size of the rings and the air-gaps can be adjusted
empirically to spark at these voltages. The problem is only how to do this
without damaging the instrument and with a HV source that can deliver only
62kV. The 62kV would create a max current of
. We can take the rounded practical max. values
of 10kV at point 1, and 20kV at point 2. The
function of the corona rings is to prevent the rise of the voltage at
these two points above these max. values by creating a spark to the
ground. Now the size of the rings and the air-gaps can be adjusted
empirically to spark at these voltages. The problem is only how to do this
without damaging the instrument and with a HV source that can deliver only
62kV. The 62kV would create a max current of ![]() that in
turn would produce max.
that in
turn would produce max. ![]() and
and ![]() . These voltages are not enough to adjust the rings to
spark at 10kV and 20kV.
. These voltages are not enough to adjust the rings to
spark at 10kV and 20kV.
Therefore the rings should not be created and adjusted at the points 1 and 2 where they will have to be placed before final assembly, but at other points closer to the HV end, where the desired voltages can be achieved even with the max. 62kV input. The available HV supply can reliably deliver a voltage approximately between 30kV and 60kV. For the sake of easy adjustment we can take the middle of this voltage range 45kV to serve as the input voltage that should create the desired test voltages at certain points.
If the input voltage is 45kV and we have 25 pieces of 200M resistors then the voltage drop on one resistor is about 45kV/25=1.8kV. So the closest point to the output where we can get the 10kV is 10kV/1.8kV=5.56. By ignoring the decimals we get that the first ring should be created and tested at point 5 in the above drawing, and when it works correctly then moved to the final destination of point 1.
If we want 10kV at point 5 then the current should be ![]() . This current will create an output voltage (indicated by
the instrument) of
. This current will create an output voltage (indicated by
the instrument) of ![]() , which corresponds to 49.75kV at the
input. That means, the ring at point 5 should be adjusted empirically to
allow the voltage to rise up to 49.75V at the output (when the
input HV is manually increased, slowly) without sparking. But this voltage
limit should not be exceeded, since for higher voltages spark should jump
between the point 5 and the corona ring, and prevent higher output
voltage. When the ring is adjusted, it should be removed until the second
ring is adjusted in similar fashion.
, which corresponds to 49.75kV at the
input. That means, the ring at point 5 should be adjusted empirically to
allow the voltage to rise up to 49.75V at the output (when the
input HV is manually increased, slowly) without sparking. But this voltage
limit should not be exceeded, since for higher voltages spark should jump
between the point 5 and the corona ring, and prevent higher output
voltage. When the ring is adjusted, it should be removed until the second
ring is adjusted in similar fashion.
For the adjustment of the second ring we need 20kV. The closest
test point to the output that can have this voltage at 45kV input
is calculated as: 20kV/1.8kV=11.11. By ignoring the
decimals we get the point 11 as the new place for the second ring
to be adjusted. To get the 20kV there we need a current of ![]() . Finally the output voltage that this current creates is
. Finally the output voltage that this current creates is
![]() which corresponds to 45.35kV at the input. The
adjustment of the second ring to spark at this voltage is similar as for
the first ring described above.
which corresponds to 45.35kV at the input. The
adjustment of the second ring to spark at this voltage is similar as for
the first ring described above.
The derived voltages should be considered to be peek voltages, so if the output wave form of the HV supply is rectified sine wave or other shape that significantly differs from the smooth DC, then a correction factor should be taken into account when reading the displayed values of the digital multimeter. Another alternative is to read the peek voltage with an oscilloscope. In our case the AC ripple was less than 10% of the DC component so we may take 10% less output measured voltages on the DMM to be allowed by the ring, in order to compensate for the ripple (or just read the peak value directly with the scope).
Before the final assembly both rings should be removed from the point 11 and 5, and placed at points 2 and 1 to provide the right protection (and not to spark before the desired voltages).
Created by Zoltan Losonc (feprinciples@on.mailshell.com) on 21 July 2003. Last updated on 6 September 2003.
|
Instrument component |
|