
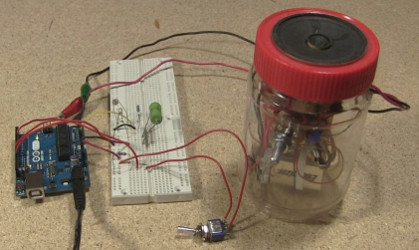
For a first Ardunio project I figured I'd have fun making it talk and interacting with it in some way. After some searching I found this Talkie library on github. Adding a switch and a photocell and using my homemade amplifier I came up with the fun video below.
|

|
I also used this Talkie library in my Arduino controlled skull for a Halloween project. That also included working a servo and the used of a proper microcontroller loop in the code. Follow the link for full details, including the code. |
Circuit diagrams for Arduino speech synthesizer plus other parts
Shown below is the circuit diagram for the last demonstration in the above video. To use the Talkie library yourself with your own circuit, the only thing you need is the speaker and optional amplifier on the right which is connected to pin 3 and to ground.
|
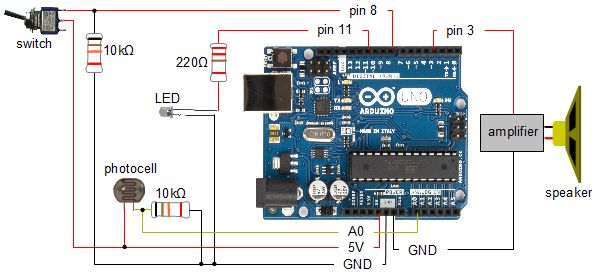
This is really four separate circuits, any one of which can be used on its own. The four circuits are listed below and highlighted in the diagram below:
- on/off switch to tell the Arduino code to start or stop doing things,
- an LED for the Arduino code to control based on the switch position,
- a photocell sensor that tells the Ardunio code how much light there is near the photocell, and
- a speaker for the Arduino code to play sound to. In this case
the speaker is connected to an amplifier. The sound is
the synthesized speech generated by the Talkie library that the
Arduino code uses.
Diagram showing separate circuits. 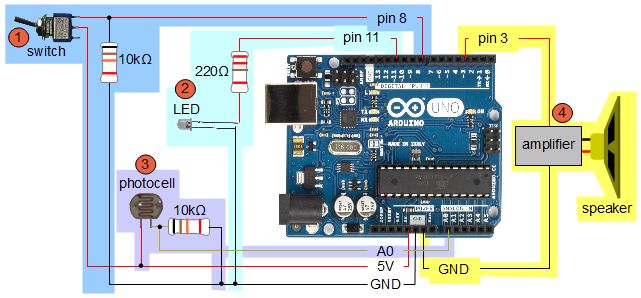
Using Talkie with an Arduino
To use Talkie in your own code, all you need to do, as shown below, is:
- include the Talkie header file,
- declare a variable of type Talkie (I call it "voice" below),
- declare a variable for each synthesized speech you have (I call it "spah" below), and
- in the body of your code, call the "say" function whenever you want it to talk.
Here's a very simple demonstration that will say hello world as soon as you power up the Ardunio.
/*
A very simple code that says "Ah, that's better." using the
Talkie library and an amplifier and speaker connected to pin 3
and to ground.
*/

#include "talkie.h"

Talkie voice;

/* the data that says "Ah, that's better." */
uint8_t spah[] PROGMEM = {0x2d,0xa0,0xdd,0x48,0xdb,0xc2,0xac,0xd8,0x2e,0x11,0x75,0x0f,0x72,0x12,0xd7,0xc3,0xd9,0xbc,0xf0,0xcd,0x4e,0xe1,0x7b,0x24,0x69,0x16,0x0e,0x40,0x68,0x51,0x11,0x08,0x40,0xa8,0x51,0x1e,0x30,0x80,0x6f,0x9e,0x83,0xf3,0xdd,0x83,0xc5,0x0b,0x37,0xde,0x2d,0x13,0x35,0x0f,0x5c,0xbd,0xe4,0xe9,0xe1,0x24,0x29,0x81,0x93,0x2f,0x4a,0x90,0x98,0x14,0x76,0x3d,0xf0,0xa1,0xaa,0x32,0x19,0x01,0xdc,0xaa,0x31,0x53,0x07,0x35,0x55,0x0b,0x8c,0x3c,0xe0,0xdc,0xcd,0x2d,0x12,0xca,0x81,0x2d,0xf7,0xb4,0x58,0xa8,0x01,0x2e,0xcc,0xd4,0x13,0x39,0x9f,0xd7,0x30,0x37,0x35,0xb2,0x52,0xd9,0x5d,0xc3,0xc4,0xc8,0xc9,0x54,0xf7,0x34,0x71,0x21,0x27,0x93,0x43,0xcb,0xdd,0x88,0x96,0x82,0x6d,0x29,0x67,0x25,0x66,0x4a,0xb6,0xd5,0x5d,0x44,0xa8,0x2b,0x4d,0xa8,0xf4,0x34,0x53,0x29,0x6b,0xc6,0xdc,0xd4,0x22,0x17,0xd7,0x53,0xf7,0x48,0x6f,0xac,0x38,0xa0,0x23,0xbc,0xdc,0x12,0xe9,0x85,0x70,0xb7,0xb4,0x48,0xc6,0x81,0xcd,0x2a,0x4d,0x2d,0xb7,0x14,0xe6,0xe2,0x08,0x8c,0x32,0x72,0xd1,0xd4,0x5b,0x59,0xe8,0x28,0x75,0xa5,0x4a,0x13,0xa1,0xa5,0x61,0x4d,0x3c,0x4d,0x84,0xa6,0x8e,0x3a,0x49,0x0b,0x37,0x9d,0x58,0xd6,0x69,0xc4,0x59,0x72,0x62,0x6c,0x85,0xd3,0x60,0xc9,0x81,0xd5,0x0d,0x4e,0x8c,0xc5,0x46,0xde,0x34,0xa0,0xc0,0x96,0x4a,0x14,0xd5,0xb3,0x04,0xd9,0x26,0x51,0x44,0x1f,0x32,0x70,0x05,0x47,0x15,0x65,0x08,0x0c,0x52,0x92,0x84,0xc4,0x21,0xa0,0x58,0xa8,0x5d,0x92,0x68,0x27,0x48,0xa3,0x71,0x48,0x8e,0x8d,0x12,0x6f,0xc4,0x7e};

void setup()
{
  voice.say(spah); /* say "Ah, that's better." */
}

void loop()
{
}
And here's the Arduino source code for the last demonstration in the above video.
/*
An LED on digital pin 11 and a switch on pin 8 to turn
it on and off. There's a photocell or photo resistor in
analog pin 0.

When you turn on the LED using the switch, the photocell
sees this light and the arduino says
"Turn off the light! I'm sleeping!". You block the light
from the photocell with your finger and it says
"Ah, that's better." Or if you turn off the LED using the
switch, the arduino also says "Ah, that's better."
*/

#include "talkie.h"

Talkie voice;

/* the data that says "Turn off the light! I'm sleeping!" */
uint8_t spturn[] PROGMEM = {0x0c,0x28,0xab,0x34,0x79,0x24,0xa9,0xd7,0x72,0xe4,0x64,0xf3,0x8e,0xcb,0x6a,0x51,0x8b,0xa1,0x0b,0x8c,0xb6,0xda,0x0d,0x06,0x58,0x3c,0x1e,0x11,0x77,0xe9,0xae,0xb1,0x47,0x88,0xb9,0xa5,0xfb,0x26,0x6a,0xae,0xe1,0x96,0xe6,0x9b,0x8b,0xba,0x94,0x1d,0x9a,0xad,0x26,0x16,0x1a,0xae,0xe8,0x72,0x88,0x68,0x69,0xb4,0xe0,0xa0,0xa9,0xaa,0xe9,0x65,0x43,0x6c,0x84,0x85,0xbb,0xc6,0x55,0x46,0x54,0x9e,0xea,0x66,0xd9,0x78,0x89,0xab,0x89,0x59,0x14,0x95,0x46,0x67,0xa2,0xca,0xa6,0x03,0x57,0xb5,0xbb,0xba,0xc5,0x29,0x2e,0xbe,0xa1,0xac,0x1e,0xa5,0x79,0xfc,0x33,0x7b,0xb8,0xb8,0xe6,0x8a,0x4f,0x5a,0x69,0x62,0x93,0xcb,0x3e,0xc9,0x16,0x49,0x0d,0x2e,0xfa,0x42,0xe6,0x11,0x39,0xd9,0xf4,0x93,0x78,0x59,0xe4,0x66,0xe8,0x87,0xde,0xc6,0xf2,0x86,0xe1,0x0f,0x56,0x07,0x8b,0x5b,0xa6,0x3d,0x9c,0x99,0x2c,0xee,0xd8,0x6a,0x5b,0x86,0xb1,0xd4,0xe1,0xf2,0x6e,0x6d,0x42,0xf6,0x5b,0x88,0x46,0x94,0x32,0xdb,0x2f,0x39,0x28,0x31,0x21,0x48,0x3d,0x18,0xa0,0xd7,0x28,0xa3,0x52,0xc5,0x83,0xd2,0x15,0x86,0xd6,0x90,0x8e,0x42,0x65,0x98,0x99,0x4e,0x58,0xb4,0xe2,0xd1,0x11,0x31,0x19,0x4d,0x98,0x68,0x78,0x12,0x67,0x54,0xa3,0x22,0xa6,0x4d,0x94,0x1d,0xac,0x88,0x44,0xd4,0x44,0x9c,0x30,0xa6,0x66,0x66,0x1a,0x69,0xc0,0x9a,0xb9,0x9a,0x6d,0x40,0x36,0x70,0x61,0xee,0x96,0x18,0x65,0xc0,0x86,0x99,0x99,0x6d,0x94,0x02,0x13,0xee,0xe1,0x8e,0x71,0x8a,0x1c,0xe0,0xc2,0x4d,0x5d,0x31,0x89,0x88,0x52,0x95,0xb4,0x38,0xa8,0x17,0xd2,0x93,0x4d,0xad,0x00,0x8a,0x80,0x09,0xf7,0xb0,0x38,0xa8,0x42,0xce,0xdd,0xdc,0x64,0x13,0x07,0x26,0x37,0x73,0x6d,0x14,0x02,0x30,0x39,0xc5,0xbd,0x5a,0x89,0xc0,0x94,0x20,0x8f,0xa6,0x2d,0x04,0xcd,0x92,0x8d,0x93,0x16,0x0f,0x1c,0x2b,0x35,0x4e,0x6a,0x3c,0xf0,0x25,0xd5,0xa4,0x69,0x08,0xc0,0xfe,0x12,0x53,0xb9,0x25,0x28,0x58,0x4c,0xcd,0xe2,0x8e,0x60,0x28,0x75,0x55,0xb5,0xdd,0x9c,0xa2,0xcd,0xc4,0x2d,0x4e,0xa3,0xba,0x22,0xf3,0xb0,0xc4,0xc5,0xed,0x12,0xc5,0x43,0x1b,0x17,0x0f,0xb4,0xe8,0x28,0x17,0xd3,0x2c,0xb0,0x62,0x8c,0x44,0x6a,0x31,0xc1,0x89,0x56,0xe4,0xe4,0xc5,0x04,0xbb,0xda,0x89,0xdc,0x17,0x0b,0xac,0x68,0x13,0x52,0xe6,0x02,0x70,0xb4,0xd4,0xc4,0x8e,0x30,0xe0,0x89,0x30,0x65,0x2b,0xc4,0x84,0x27,0x42,0x85,0x65,0x27,0x1f,0x66,0x5d,0x4d,0x11,0xbb,0x62,0x56,0x74,0xd4,0x49,0xcc,0xca,0x68,0xd2,0x71,0x66,0x69,0xad,0x04,0xd1,0xc7,0x98,0xed,0x25,0x13,0x44,0xdf,0x20,0x4a,0x66,0x6c,0x30,0x63,0x54,0xd8,0x8e,0x70,0xc1,0xeb,0x0a,0x25,0xcb,0x00,0x80,0x02,0x50,0xbd,0x32,0x23,0xd6,0x03};

/* the data that says "Ah, that's better." */
uint8_t spah[] PROGMEM = {0x2d,0xa0,0xdd,0x48,0xdb,0xc2,0xac,0xd8,0x2e,0x11,0x75,0x0f,0x72,0x12,0xd7,0xc3,0xd9,0xbc,0xf0,0xcd,0x4e,0xe1,0x7b,0x24,0x69,0x16,0x0e,0x40,0x68,0x51,0x11,0x08,0x40,0xa8,0x51,0x1e,0x30,0x80,0x6f,0x9e,0x83,0xf3,0xdd,0x83,0xc5,0x0b,0x37,0xde,0x2d,0x13,0x35,0x0f,0x5c,0xbd,0xe4,0xe9,0xe1,0x24,0x29,0x81,0x93,0x2f,0x4a,0x90,0x98,0x14,0x76,0x3d,0xf0,0xa1,0xaa,0x32,0x19,0x01,0xdc,0xaa,0x31,0x53,0x07,0x35,0x55,0x0b,0x8c,0x3c,0xe0,0xdc,0xcd,0x2d,0x12,0xca,0x81,0x2d,0xf7,0xb4,0x58,0xa8,0x01,0x2e,0xcc,0xd4,0x13,0x39,0x9f,0xd7,0x30,0x37,0x35,0xb2,0x52,0xd9,0x5d,0xc3,0xc4,0xc8,0xc9,0x54,0xf7,0x34,0x71,0x21,0x27,0x93,0x43,0xcb,0xdd,0x88,0x96,0x82,0x6d,0x29,0x67,0x25,0x66,0x4a,0xb6,0xd5,0x5d,0x44,0xa8,0x2b,0x4d,0xa8,0xf4,0x34,0x53,0x29,0x6b,0xc6,0xdc,0xd4,0x22,0x17,0xd7,0x53,0xf7,0x48,0x6f,0xac,0x38,0xa0,0x23,0xbc,0xdc,0x12,0xe9,0x85,0x70,0xb7,0xb4,0x48,0xc6,0x81,0xcd,0x2a,0x4d,0x2d,0xb7,0x14,0xe6,0xe2,0x08,0x8c,0x32,0x72,0xd1,0xd4,0x5b,0x59,0xe8,0x28,0x75,0xa5,0x4a,0x13,0xa1,0xa5,0x61,0x4d,0x3c,0x4d,0x84,0xa6,0x8e,0x3a,0x49,0x0b,0x37,0x9d,0x58,0xd6,0x69,0xc4,0x59,0x72,0x62,0x6c,0x85,0xd3,0x60,0xc9,0x81,0xd5,0x0d,0x4e,0x8c,0xc5,0x46,0xde,0x34,0xa0,0xc0,0x96,0x4a,0x14,0xd5,0xb3,0x04,0xd9,0x26,0x51,0x44,0x1f,0x32,0x70,0x05,0x47,0x15,0x65,0x08,0x0c,0x52,0x92,0x84,0xc4,0x21,0xa0,0x58,0xa8,0x5d,0x92,0x68,0x27,0x48,0xa3,0x71,0x48,0x8e,0x8d,0x12,0x6f,0xc4,0x7e};

int photocell_pin = 0;
int switch_pin = 8;
int led_pin = 11;

int last_brightness = 1023;
int last_said_spah = true;
boolean current_switch_pos = LOW;
boolean last_switch_pos = LOW;

void setup()
{
  // we don't need to set photcell_pin as an INPUT pin since
  // it's set to that by default

  analogReference(DEFAULT); // isn't necessary, will do by default

  pinMode(switch_pin, INPUT);
  pinMode(led_pin, OUTPUT);

  Serial.begin(9600);
}

boolean debounce(boolean last)
{
  boolean current = digitalRead(switch_pin);
  if (last != current) {
    delay(5);
    current = digitalRead(switch_pin);
  }
  return current;
}

/*
 * In the first section of code below, we get the brightness
 * that the photocell sees.
 * If the brightness is below a certain value (e.g. 870) and
 * was above a certain value the last time we were in this
 * loop (e.g. 900), then it's just gotten darker and we say
 * "Ah, that's better."
 * Otherwise, if the brightness is above a certain value (e.g. 900)
 * and the switch/LED is turned on and we'd previously said
 * "Ah, that's better." then say "Turn off the light! I'm sleeping!"
 *
 * The values mentioned above and used below (e.g. 870 and 900)
 * are ones you will likely have to change. Run the Arduino's
 * Serial Monitor and you'll see the brightness values for the
 * photocell being displayed in the Serial Monitor window.
 * Use these values to see what the photocell sees under your
 * lighting conditions as you play the the switch and block and
 * unblock the photocell with your finger.
 *
 * The second section of code controls turning the LED on or
 * off based on the switch position. As a special case, if
 * we turn off the LED and we hadn't just said "Ah, that's better."
 * then we say it now.
 */
void loop()
{
  int brightness;

  brightness = analogRead(photocell_pin);
  Serial.println(brightness);
  delay(500);
  if (brightness < 870 && last_brightness > 900) {
    voice.say(spah); /* say "Ah, that's better." */
    last_said_spah = true;
  } else if (brightness > 900 && current_switch_pos == HIGH && last_said_spah) {
    voice.say(spturn); /* say "Turn off the light! I'm sleeping!" */
    last_said_spah = false;
  }
  last_brightness = brightness;

  current_switch_pos = debounce(last_switch_pos);
  if (last_switch_pos == LOW && current_switch_pos == HIGH) {
    digitalWrite(led_pin, true);
  } else if (last_switch_pos == HIGH && current_switch_pos == LOW) {
    digitalWrite(led_pin, false);
    if (!last_said_spah) {
      voice.say(spah); /* say "Ah, that's better." */
      last_said_spah = true;
    }
  }
  last_switch_pos = current_switch_pos;
}
Some notes for using Talkie
There is plenty of information on the github page but here is some stuff from my notes.
Connect your headphones, speaker, or in my case an amplifier, to the Arduino's pin 3.
It may be a bad idea to use pin 11 while using Talkie. I saw something on https://github.com/sensorium/Mozzi, another Arduino syntesizer, that said "but you can use the Timer2 pins, 3 and 11 (your board may differ)" which led me to think that since Talkie uses pin 3, using pin 11 for something else was a bad idea. Sure enough, a DC motor doesn't work on pin 11 but works on pin 10 while using Talkie.
I found that there was a lot of interference depending on how close the wires were to each other and where they were placed on the breadboard. So try to keep the different sections of the circuit apart.
Making your own speech for Talkie
The Talkie download comes with a lot of example speech which you can use in your Ardunio program. According to the github pages, "The examples (with the exception of Tom's Diner) are extracted from commercial ROMs mastered by the Texas Instruments mastering hardware, for the TMS5220 family of chips." Since I have ads on my videos, to use it I had to provide my own speech to avoid any possible copyright issues.
There is currently (March 2015) no simple method provided for making your own speech like this but there is information in the Q&A in the github Talkie issues section. I tried documenting how I did it but even describing it all and simplifying it was too huge a task. I figured it out using clues in the above mentioned Q&A and there looks to be some progress in the Q&A on simpler solutions than mine so I won't be releasing how I did it (though I'd very much like to.) I had to write a program in C to do one conversion step to go from binary to hex data but in the above Q&A some simple PHP code is given that does the same as my C program does. That's really the only missing piece.
