Perhaps the simplest way to make a powerful high voltage DC power supply
is to adapt an old PC/computer monitor. This will give you around
24kV and somewhere in the high triple digit microamps when
flying a lifter.
As shown below, you just:
- connect one or two wires to the Earth ground inside and
make them accessible outside the case, and
- disconnect the high voltage wire from the cathode ray tube
(CRT) inside and make it accessible outside the case.
Wires coming out of the PC monitor power supply.
 |
|
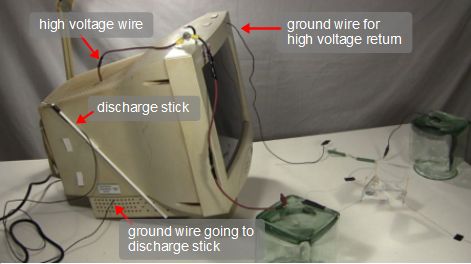
Converting the PC monitor into a high voltage power supply
The high voltage wire being used is the one that normally goes to
the CRT display. To save power, some PC
monitors will power the
display only if there is a computer connected. They are usually
labeled in some way as energy saving types of monitors.
That kind of monitor
will not work as a high voltage power supply, unless you're willing
to connect to a computer when working with high voltage, which is
not a good idea since you might accidentally zap the computer, and you
also won't see what the computer is trying to display since you'll
be using the wire that normally goes to the display as your high voltage
output wire.
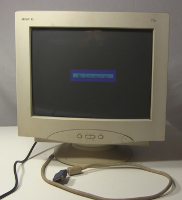
You can test this by disconnecting from any computer and turning
the monitor on. As long as you see something on the display, even
a message like that shown below, then you can use that monitor.
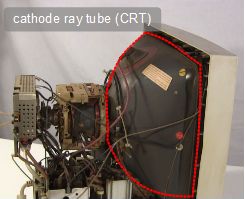
The next step is to open the case and can be dangerous. If the
monitor has been on in the past 24 hours then there may still be
a high voltage inside the monitor. So leave it off for at least
24 hours before opening it. Even then, be careful when you open it
up to not go anywhere near the cathode ray tube shown below.
Display is working.
 |
|
The cathode ray tube (CRT).
 |
|
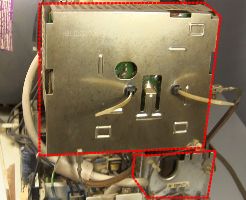
The ground wires
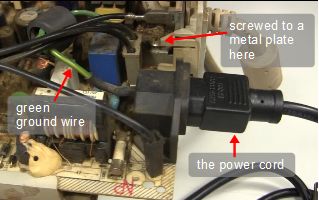
For the ground wires look to where the power cord entered the
monitor. In the power cord there are three wires with different
colored insulation on them: black, white and green. Inside the
monitor, the end of the green wire will be screwed to the a metal
plate somewhere. There are likely wires going from there to other
metal plates, grounding them.
NOTE:
A good point has been made that instead of connecting to the green
ground wire, the white NEUTRAL wire might be a better choice
technically. This is because in many houses the ground wire
goes to a type of breaker that will trip if it detects some amount
of small milliamps of current. That's because ground wires don't
normally have current through them unless there's a fault.
Depending on the country you're in these are called GFCI breakers
or RCD breakers and possibly other names. While technically that's
true, in this case it works okay with ground because the current is
typically in the microamps.
The green ground wire and where it connects.
 |
|
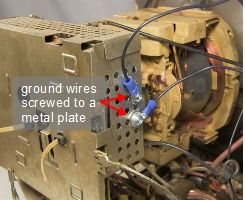
Other grounded metal plates.
 |
|
I used existing holes in one of those plates to bolt on two wires.
Make sure you make a good electrical connection between the wires
and the plate. I even used sandpaper to clean the plate and include
a star washer to help penetrate any layers. This is done by making
the attachment in the order:
1. bolt, 2. wire's connector or wire, 3. flat washer, 4. star washer,
5. plate, 6. nut
Mounting hardware.
 |
|
Ground wires connected to plate.
 |
|
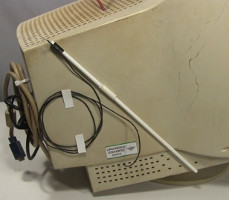
For this monitor, as shown below, I sent one ground wire out a hole
in one side and I drilled a hole in the top-front of the monitor and
ran the other ground wire out through that.
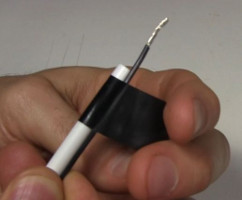
One of the ground wires is for discharging things to make things safe
after turning off the power supply. I taped that to a stick which I
refer to as a discharge stick. I even arranged it so the discharge
stick could be attached to the side of the monitor when not in use.
Ground wires exiting the case.
 |
|
Taping ground wire to discharge stick.
 |
|
The discharge stick attached to the case.
 |
|
NOTE:
The wires I used for the ground wire have insulation that's actually
too thin. It would be better using high voltage wire with thickness
like that of the high voltage wire discussed below.
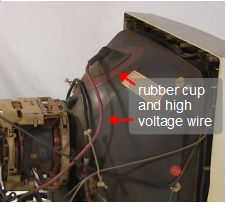
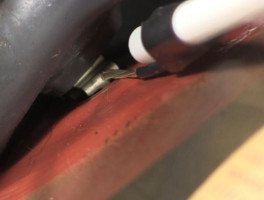
The high voltage wire
The high voltage wire is the one shown below that enters the
CRT through the rubber cup. As stated above, it's best to wait at
least 24 hours after turning off the monitor before going near this
part, for the charge to dissipate. Even then, plug in the monitor,
BUT LEAVE IT TURNED OFF, and lift up the edge of the cup with
insulated pliers and touch the connector underneath with the
end of the ground wire on the discharge stick to discharge any
remaining charge. At this point it's safe to touch.
NOTE:
It's even been suggested that the insulation on the pliers may not
be sufficient and that you should pry up the rubber cup using another
long plastic stick instead.
The high voltage wire and rubber cup.
 |
|
Discharging the high voltage.
 |
|
View under the cup.
 |
|
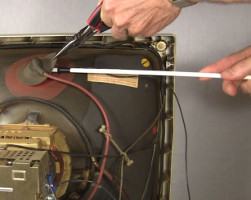
Use the pliers to unclip the wire from the CRT and cut the wire
as long as you can. Strip the end of the wire carefully since there
are two layers of thick insulation and it's easy to cut through the
thinner wire insde. Make a hole in the case and push the end of the wire
through.
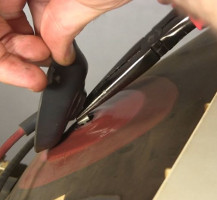
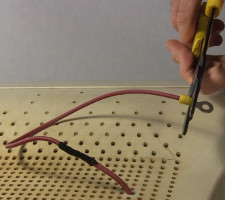
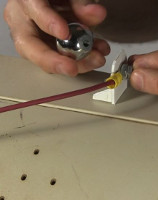
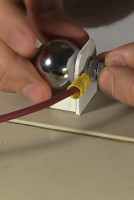
As shown below, I got fancy and extended the wire and attached a ring
connector to it. I also made a plastic support at the top-front of
the monitor where I connected the high voltage wire to a round metal
ball using a bolt. This acts as a mounting point for connectors with
wires going elsewhere (as you can see in the lifter test setup below.)
I simply unbolt it and attach more connectors.
The roundness is important to minimize leakage through ionization.
The ball was something I bought at a lighting store and I don't know
what its original purpose was. Drawer knobs also work.
Unclipping the wire from the CRT.
 |
|
Attaching a ring connector.
 |
|
Attaching a metal ball...
 |
|
... screwing it on.
 |
|
Done!
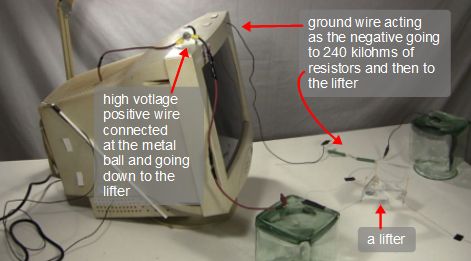
Testing the PC monitor high voltage power supply with a lifter
To test it I connected it to a
lifter, as shown below.
It's VERY, VERY IMPORTANT
for these PC monitor high voltage power supplies that you
connect around 240 kilohms of at least 2 watt rated resistance in
series with the output circuit. I do this as shown below, on the
ground side, avoiding issues with sharp edges that way. If you don't
include this resistance then you'll likely damage the power supply
when you have a few powerful sparks. The added resistance decreases
the current from the sparks.
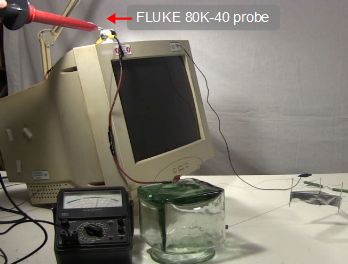
I also measured the voltage using my
FLUKE 80K-40 high voltage probe as
around 24 kilovolts while the lifter was flying.
Flying a lifter using the PC monitor power supply.
 |
|
Measuring the voltage.
 |
|
Video - How to Make PC/Computer Monitor into High Voltage Power Supply
The video below goes step-by-step through how to turn a monitor
into a high voltage power supply. It also demonstrates using it to
fly a
lifter and while measuring
the voltage being used for that using a
FLUKE 80K-40 high voltage probe.

