Mobile off-grid solar power system
The following is a fairly large, 1100W, mobile off-grid system on a trailer, with solar panels, batteries, inverter, charge controller, ... Their plan is to eventually "move into our 5th wheel trailer and travel. In theory we could have a base camp most anywhere if we park next to the solar trailer." The whole thing was done on a budget for $3,500, not including the cost of the trailer. The solar panels cost $0.50 a watt with some assembly required. This one was submitted by someone who wished to remain anonymous. Our thanks for sharing it.
The solar panels are Sun 185W 29V laminates from www.sunelec.com. They come with the frames and junction boxes stripped off. You have to dig out the contacts, solder in the lead wires and put a junction box over the connections. I did this then built frames for them using steel studs from the Home Depot. I am very happy with the panels. They are good quality monocrystaline and I got them for the unbelievable price of 50 cents per watt. It was just a PIA to wire and frame them.
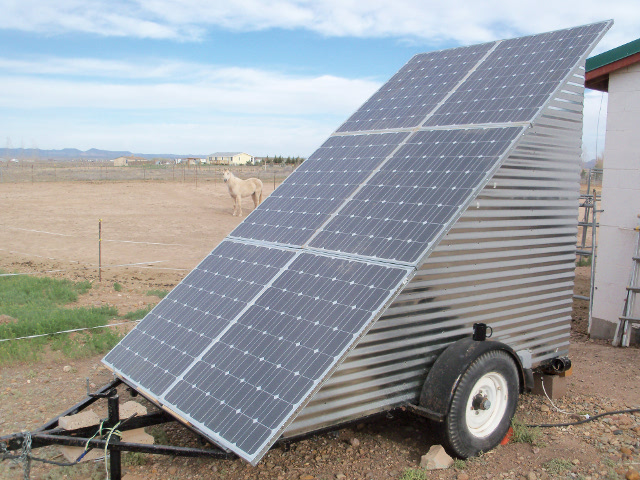
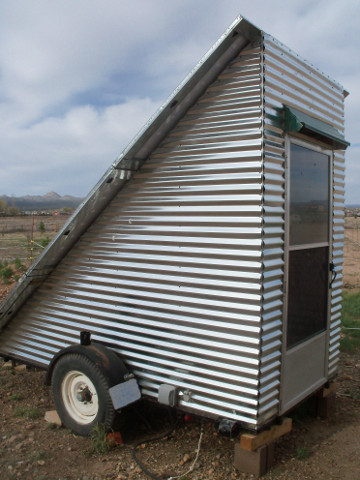
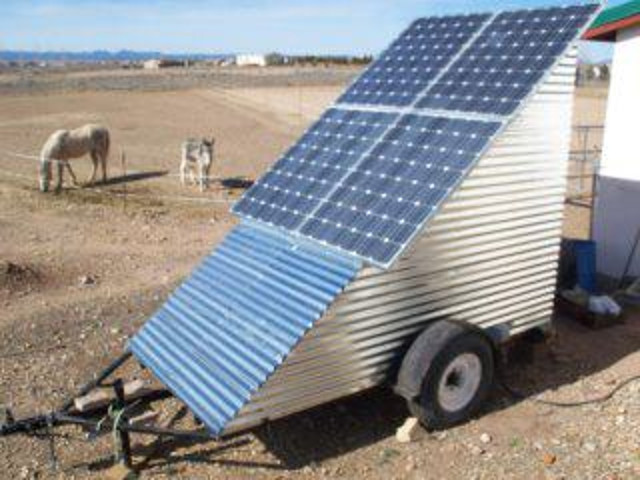
The lower two panels are too close to the road and would be at risk for damage when towing the trailer so I made them removable and they can be packed inside the trailer (see photos below.) They also have "A" frame legs to make them freestanding. I have taken one off and used it for camping and for charging the truck battery several times. There are blank tin roof sections to cover the openings when the panels are removed.

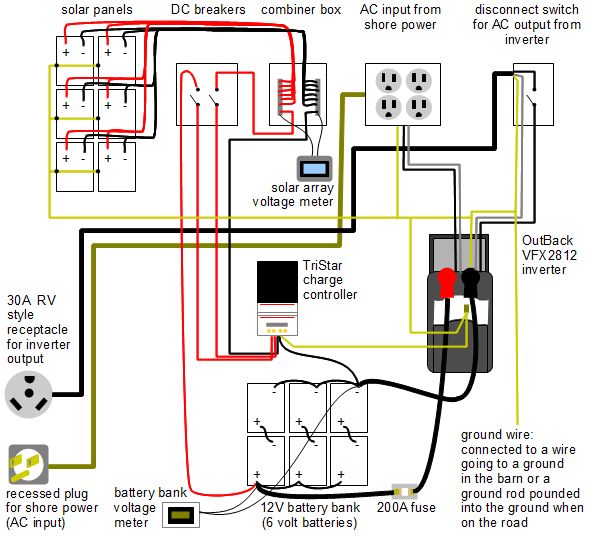
A complete wiring diagram can be found below.
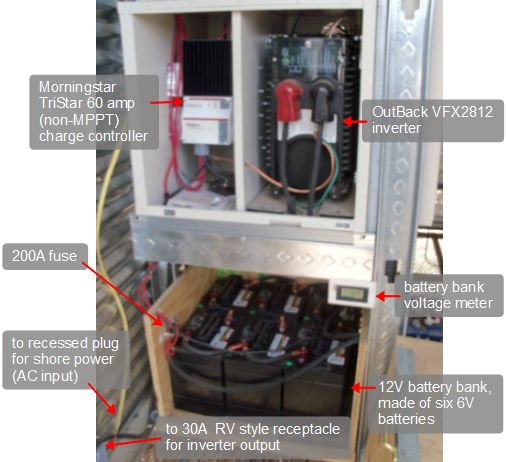
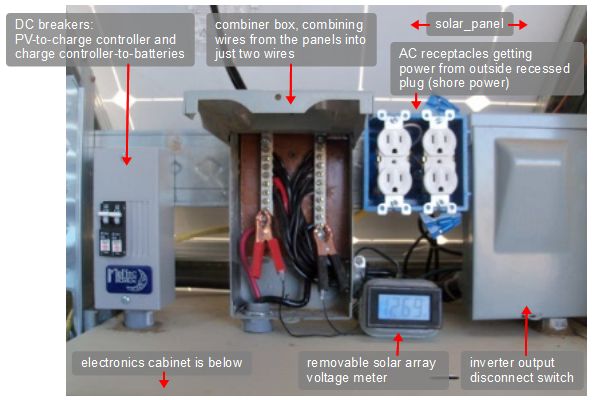
The charge controller (photo below) is a Morningstar 60 amp TriStar with PWM (pulse-width modulation) and I wish I could afford the MPPT (maximum power point tracking) model.
The second hand inverter, an OutBack VFX2812, is a 12 volt model so for the time being I'm stuck with a 12V battery bank.
There are six 6V golf cart batteries from Sam's Club wired to make a 12V battery bank. This is done by creating three pairs of two, where each two are connected in series (+ to -) and then the three pairs are connected in parallel (+ to +, - to -). I could use twice as many batteries as they are fully charged by noon every day.
The meter above the battery box reads battery bank voltage.

From left to right above the electronics cabinet (see photo below) there is a Midnite Solar box with DC breakers for the solar/PV array to the charge controller and from the charge controller to the battery bank. Next is a home made combiner box with a removable meter showing solar array voltage. The receptacles are shore power and are wired to a 110V recessed plug on the outside. This is for feeding the inverter/charger and my power tools when I was putting everything together. On the far right is a pull switch fuse box to disconnect the output of the inverter.
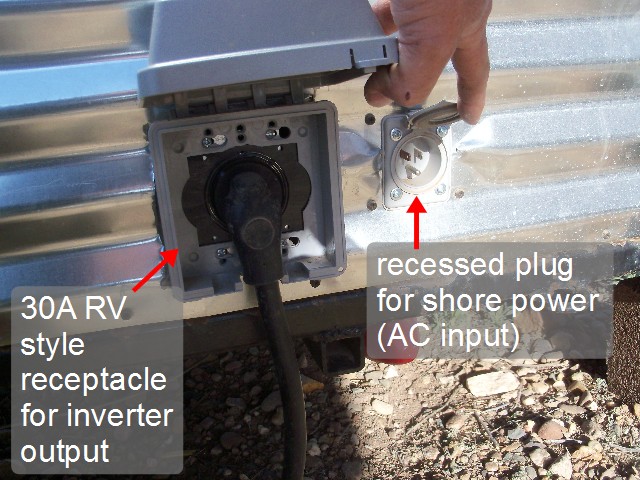
The inverter is also a charger for charging batteries using shore power (meaning an outlet that a mobile unit can plug into for AC power when parked.) A recessed plug is provided on the side of the trailer (photo below) for this.
The 110VAC output from the inverter goes through the disconnect switch (photo above) to a 30A RV style receptacle in a weatherproof cover (photo below.) The RV cord shown is wired into a Siemens manual lockout transfer switch in the barn breaker panel. The transfer switch allows me to switch back and forth between utility power and solar.
There is a #4 bare copper ground attached to all of the panel frames and the trailer. It hangs a few inches below the trailer frame and is attached to another #4 and the ground at my barn just a few feet away. If I use it mobile I will bring along a ground rod and drive it into the ground next to the trailer.
Conclusion
In my situation I was able to separate my property and take just the barn off the grid. In doing so I have reduced my electric bill by 40%.
I didn't have a lot of money to devote to this project so there are some things I plan on changing. I want to either get a second inverter or an auto-transformer to enable me to run my 220V well pump and I would like to go with a 24V inverter. I would get a lot more out of the panels if I had an MPPT charge controller. I could double or triple the number of batteries and have more days of autonomy.
The system is what it is and I'm pleased with what it does. I kept receipts and the project cost $3,500 not counting the flatbed trailer it is built on. I figure a 6 year pay back based on current electricity rates and the peace of mind of having some backup power.
|
Do you have a project you'd like to share on rimstar.org too? You're more than welcome to. Click here for details. |
|

