Raspberry Pi to Arduino serial USB communication
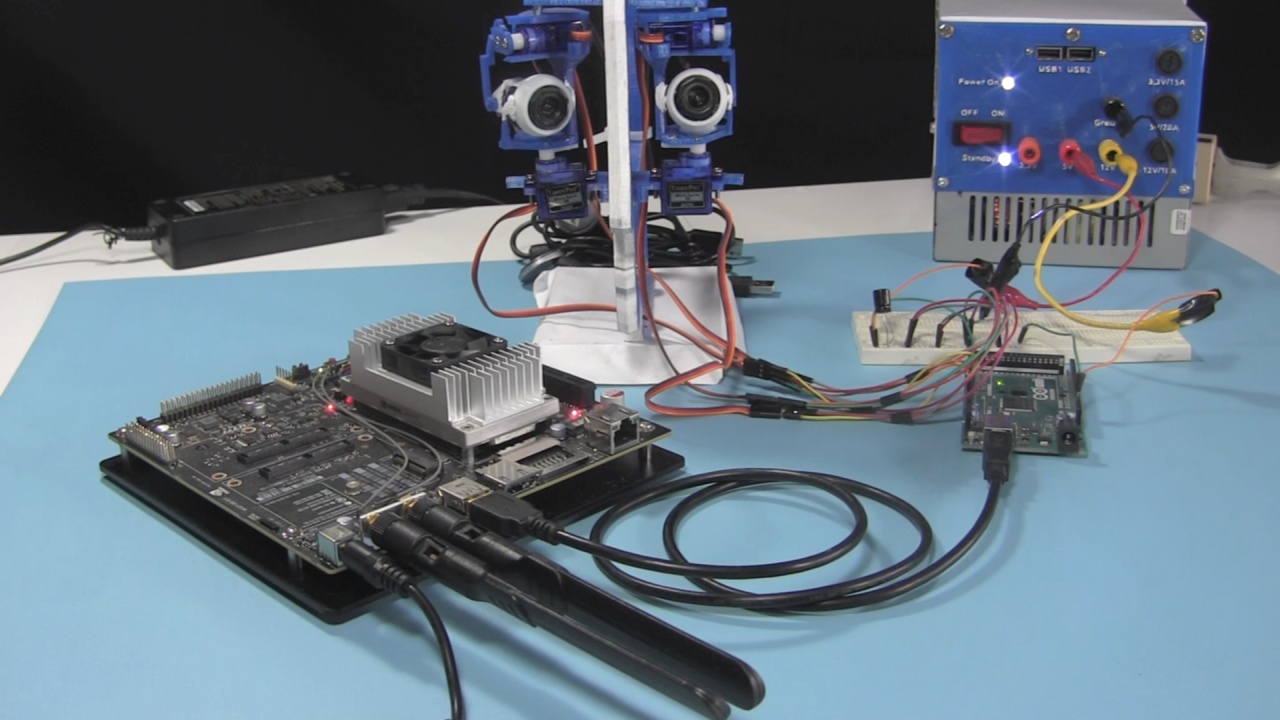
This is how to communicate between a Raspberry Pi and an Arduino using serial over the USB cable. Note that this should also work for communicating between an Arduino and anything else that can communcate using serial over a USB cable. For example, I've used it to also communicate between an NVIDIA Jetson TX1 and an Arduino Mega 2560.
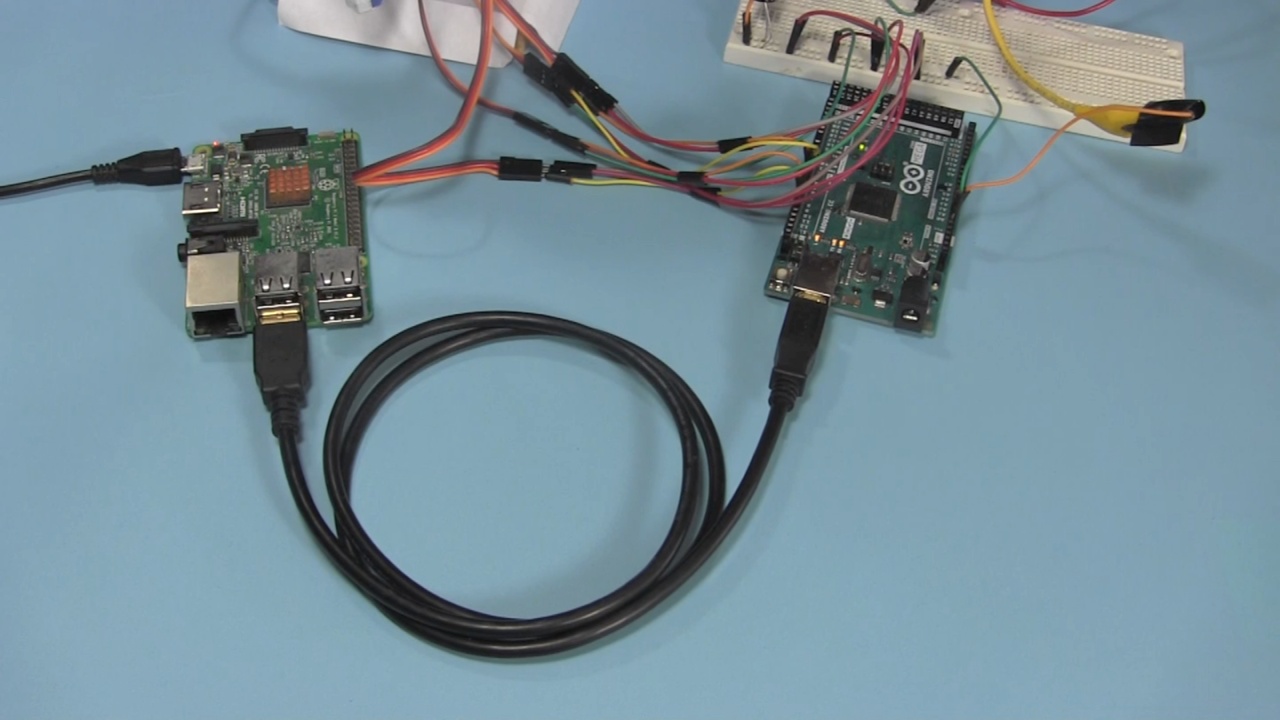
The cable used is the same one that comes with the Arduino for programming it.
The programming source code
There is a trick which I learned from a project on Hackaday.io for getting it to work for communication in both directions. The trick is that on the Raspberry Pi, in your programming code, after you open the serial port you need to sleep for 1 second and then set DTR, though sometimes it seems that just sleeping for 1 or two seconds is enough.
Here it is for the C language. See it in use in the code further below.
	sleep(1);
	tcflush(fd, TCIFLUSH);
	bits &= TIOCM_DTR;
	if (ioctl(fd, TIOCMSET, &bits) < 0) {
		close(fd);
		perror("ioctl(TIOCMSET)");
		return -1;
	}
Here it is for python. See it in use in the code further below.
time.sleep(1)
ser.flushInput()
ser.setDTR(True)
time.sleep(2)
The following are examples that have the Raspberry Pi make the built-in diode on the Arduino blink. First is the Arduino code. That's followed by the code for the Raspberry Pi in both the C language and in Python.
Arduino code - Blinking built-in diode example
Here's the full code for the Arduino side for communicating with the Raspberry Pi using serial USB.
/*
 * serial_usb_simple_arduino - For communicating over USB serial. Send it a '1' (character one)
 * and it will make the builtin LED start blinking every one second. Send it a '0'
 * (character zero) and it will make it stop blinking.
 *
 * Each time it receives one of the commands, it sends back an 'A' for acknowledge.
 * But send it a commmand it doesn't recognize and it sends back an 'E' for error.
 */

bool blinking = false;
bool led_on = false;
int target_time;

void setup() {
  Serial.begin(115200);
  while (!Serial) {
    ; // wait for serial port to connect. Needed for native USB
  }
  pinMode(LED_BUILTIN, OUTPUT);
}

void loop() {
  char c;

  if (Serial.available() > 0) {
    c = Serial.read();
    switch (c) {
    case '0':
      // stop blinking
      blinking = false;
      if (led_on) {
        digitalWrite(LED_BUILTIN, LOW);
      }
      Serial.write("A", 1);
      break;
    case '1':
      // start blinking
      if (blinking == false) {
        blinking = true;
        digitalWrite(LED_BUILTIN, HIGH);
        led_on = true;
        target_time = millis() + 100; // turn off in 1 tenth of a second (100 milliseconds)
      }
      Serial.write("A", 1);
      break;
    default:
      Serial.write("E", 1);
      break;
    }
  } else if (blinking) {
    if (millis() >= target_time) {
      if (led_on) {
        digitalWrite(LED_BUILTIN, LOW);
        led_on = false;
        target_time = millis() + 100; // turn on in 1 tenth of a second (100 milliseconds)
      } else {
        digitalWrite(LED_BUILTIN, HIGH);
        led_on = true;
        target_time = millis() + 100; // turn off in 1 tenth of a second (100 milliseconds)
      }
    }
  }
}
Raspberry Pi C language - Blinking built-in diode example
Here's the full C language code for the Raspberry Pi side for communicating with the Arduino using serial USB.
/*
 * serial_usb_simple - Demo that communicates over USB using serial I/O
 * from a Raspberry Pi to an Arduino.
 *
 * To show that it work, this writes a '1' to the Arduino which then
 * blinks the builtin LED on and off. The Arduino also sends back an 'A'
 * to acknowledge that it got the message. This does a read() to get
 * the 'A', demonstrating that reading also works. Two seconds later,
 * this writes a '0' to the Arduino which then stops the blinking.
 * The Arduino again sends back an 'A' to acknowledge that it got the
 * message and this reads the 'A'.
 *
 * This was tested between a Raspberry Pi 3B (running Raspbian) and
 * an Arduino Mega 2560 and also between an NVIDIA Jetson TX1 (running
 * Ubuntu) and the same Arduino.
*/

#include <errno.h>
#include <stdio.h>
#include <stdlib.h>
#include <string.h>
// for the serial I/O
#include <fcntl.h>
#include <termios.h>
#include <unistd.h>
#include <linux/serial.h>
#include <sys/ioctl.h>
#include <sys/stat.h>

int open_serial_port(char *name)
{
	int fd, bits;
	struct termios term;
	struct serial_struct kernel_serial_settings;

	if ((fd = open(name, O_RDWR | O_NONBLOCK | O_NOCTTY )) == -1) {
		fprintf(stderr, "open(%s) failed: %s\n", name, strerror(errno));
		return -1;
	}

	/*
	 * Reset the Arduino's line. This is key to getting the write to work.
	 * Without it, the first few writes don't work.
	 * Clear DTR, wait one second, flush input, then set DTR.
	 * Without this, the first write fails.
 	*/
	if (ioctl(fd, TIOCMGET, &bits) < 0) {
		close(fd);
		perror("ioctl(TCIOMGET)");
		return -1;
	}
	bits &= ~(TIOCM_DTR | TIOCM_RTS);
	if (ioctl(fd, TIOCMSET, &bits) < 0) {
		close(fd);
		perror("ioctl(TIOCMSET)");
		return -1;
	}
	sleep(1);
	tcflush(fd, TCIFLUSH);
	bits &= TIOCM_DTR;
	if (ioctl(fd, TIOCMSET, &bits) < 0) {
		close(fd);
		perror("ioctl(TIOCMSET)");
		return -1;
	}

	memset(&term, 0, sizeof(term));
	term.c_iflag = IGNBRK | IGNPAR;
	term.c_cflag = CS8 | CREAD | HUPCL | CLOCAL;
	cfsetospeed(&term, B115200);
	cfsetispeed(&term, B115200);
	if (tcsetattr(fd, TCSANOW, &term) < 0) {
		perror("tcsetattr()");
		return -1;
	}
	if (ioctl(fd, TIOCGSERIAL, &kernel_serial_settings) == 0) {
		kernel_serial_settings.flags |= ASYNC_LOW_LATENCY;
		ioctl(fd, TIOCSSERIAL, &kernel_serial_settings);
	}
	tcflush(fd, TCIFLUSH);

	return fd;
}

int read_from_serial(int fd, char *buf)
{
	int n;

	while (1) {
		if ((n = read(fd, buf, 1)) == -1) {
			if (errno != EAGAIN) {
				fprintf(stderr, "read() failed: (%d) %s\n", errno, strerror(errno));
				return -1;
			}
			// errno == EAGAIN, loop around and read again
		} else {
			if (n == 1) {
				return n; // stop reading
			}
			// read 0 bytes, loop around an read again
		}
	}
}

int main(int argc, char **argv)
{
	int fd;
	ssize_t n;
	char buf[10];

	if ((fd = open_serial_port("/dev/ttyACM0")) == -1) {
		exit(EXIT_FAILURE);
	}

	while (1) {

		printf("Telling the Arduino to start blinking...\n");

		if ((n = write(fd, "1", 1)) == -1) {
			fprintf(stderr, "write() failed: %s\n", strerror(errno));
			exit(EXIT_FAILURE);
		}

		// read to get the acknowledgement from the Arduino

		if (read_from_serial(fd, buf) == -1) {
			exit(EXIT_FAILURE);
		}
		buf[1] = '\0';
		printf("Arduino sent back '%s'\n", buf);

		sleep(2);

		printf("Telling the Arduino to stop blinking...\n");

		if ((n = write(fd, "0", 1)) == -1) {
			fprintf(stderr, "write() failed: %s\n", strerror(errno));
			exit(EXIT_FAILURE);
		}

		// read to get the acknowledgement from the Arduino

		if (read_from_serial(fd, buf) == -1) {
			exit(EXIT_FAILURE);
		}
		buf[1] = '\0';
		printf("Arduino sent back '%s'\n", buf);

		sleep(2);
	}

	return EXIT_SUCCESS;
}
Raspberry Pi Python - Blinking built-in diode example
Here's the full python code for the Raspberry Pi side for communicating with the Arduino using serial USB.
"""
serial_usb_simple.py  Demo that communicates over USB using serial I/O
from a Raspberry Pi to an Arduino.

To show that it work, this writes a '1' to the Arduino which then
blinks the builtin LED on and off. The Arduino also sends back an 'A'
to acknowledge that it got the message. This does a read() to get
the 'A', demonstrating that reading also works. Two seconds later,
this writes a '0' to the Arduino which then stops the blinking.
The Arduino again sends back an 'A' to acknowledge that it got the
message and this reads the 'A'.

This was tested between a Raspberry Pi 3B (running Raspbian) and
an Arduino Mega 2560 and also between an NVIDIA Jetson TX1 (running
Ubuntu) and the same Arduino.
"""

import serial
import time

ser = serial.Serial("/dev/ttyACM0", 115200, timeout=1)

# Reset the Arduino's line. This is key to getting the write to work.
# Without it, the first few writes don't work.
# Clear DTR, wait one second, flush input, then set DTR.
# Without this, the first write fails.
# This trick was learned from:
# https://github.com/miguelasd688/4-legged-robot-model

ser.setDTR(False)
time.sleep(1)
ser.flushInput()
ser.setDTR(True)
time.sleep(2)

while True:

	print('Telling the Arduino to start blinking...')
	ser.write(b'1')

	# read to get the acknowledgement from the Arduino
	while True:
		ack = ser.read()
		if ack == b'A':
			break
	print('Arduino sent back %s' % ack)

	time.sleep(2)

	print('Telling the Arduino to stop blinking...')
	ser.write(b'0')

	# read to get the acknowledgement from the Arduino
	while True:
		ack = ser.read()
		if ack == b'A':
			break
	print('Arduino sent back %s' % ack)

	time.sleep(2)
Video - Raspberry Pi to Arduino Serial USB Communication
The following video demonstrates the above code in action as well as walks through the relevant parts of the code.
