Van de Graaff generator Frequently Asked Questions (FAQ)
These are answers to questions I get a lot in the comments to my various Van de Graaff generator videos on my RimstarOrg YouTube channel.
The following questions are answered below.
Q. My homemade Van de Graaff generator doesn't work. How can I make it work?
Q. I'm using material X for my rollers or material Y for my belt. Is that okay?
Q. Can the tube that the belt is in be metal? What material can it be? Do I need any tube at all?
Q. What do I use for my ground connection? What do I connect the wire for the brush on the motor side to?
Q. Can I use batteries to run my motor?
Q. My homemade Van de Graaff generator doesn't work. How can I make it work?
A. See the frequently asked questions below as well as the following tips...
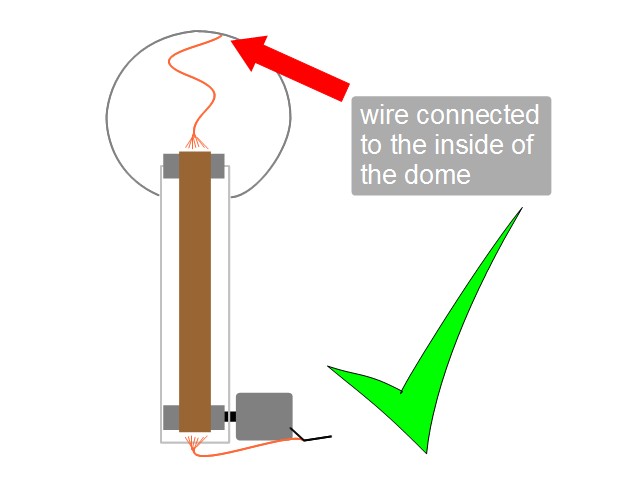
Tip - The wire should be connected to the INSIDE of the can/dome. One of the main effects that makes the Van de Graaff generator work is the use of the Faraday ice pail effect or Faraday cage effect. For that effect to work, the wire must connect to the inside of the Van de Graaff's can or dome, not on the outside.

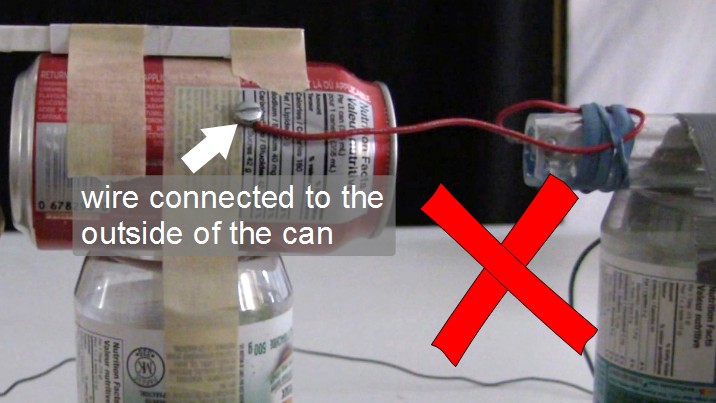
In my Van de Graaff Faraday Cage Science Experiment video shown below I show the difference in output between when putting the wire inside the can and when putting the wire outside the can.
I explain the Faraday ice pail effect in my How a Van de Graaff Generator Works video shown below starting at 11:33 minutes in.
Tip - The sharp points of the wire near the belt should be spread out and should be as close as possible to the belt without touching. You want them to be spread out since you want them to gather charge from the entire width of the belt.

Q. I'm using material X for my rollers or material Y for my belt. Is that okay?
A. Look at the Triboelectric series table (it's on the right side at this link). The surface material for one roller should be toward the positive side of the table, the surface material for the other roller should be toward the negative side of the table, and the inner surface material of the belt should be somewhere in the table in between the roller materials.
Note that wristbands have been shown to not work as belts.
See the Van de Graaff making page has more about belts and rollers.
Q. Can the tube that the belt is in be metal? What material can it be? Do I need any tube at all?
A. The tube which the belt is in must NOT be metal. More specifically it must not be made of an electrically conductive material. So for example, plastic or glass are fine. Plastic bottles work well, as do PVC and acrylic tubes. You can also have no tube at all but instead build some sort of structure around it, out of wood for example. The whole point of this part is simply structural, to hold the two rollers apart with the belt across them. Often it also supports the can/dome.
Q. What do I use for my ground connection? What do I connect the wire for the brush on the motor side to?
A. This brush should be connected to something that's a good source or sink of electrons. Sometimes that's the inside of a second dome or a connection to Earth ground.
Tip - Connect to your motor's power supply ground if it has one. Sometimes the metal case of the motor itself is connected to ground.
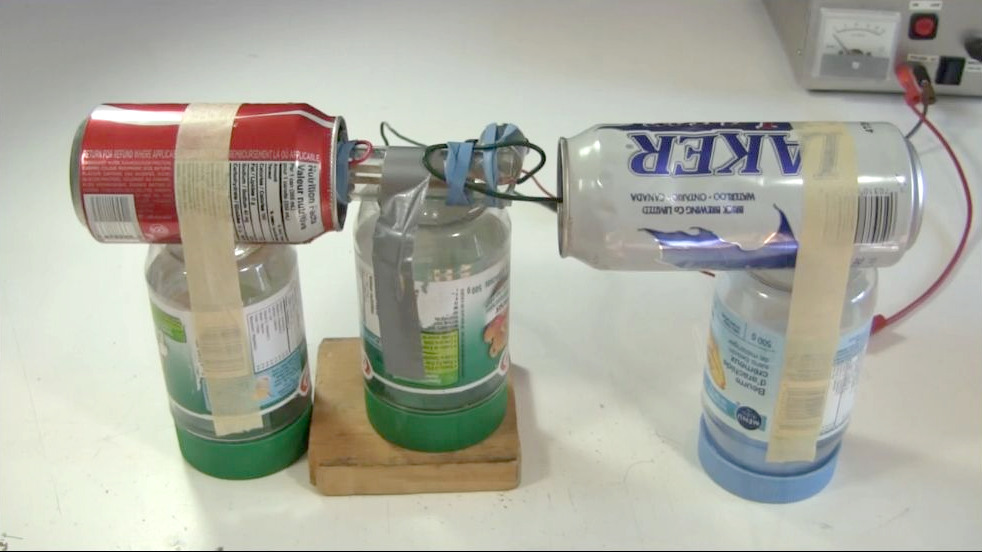
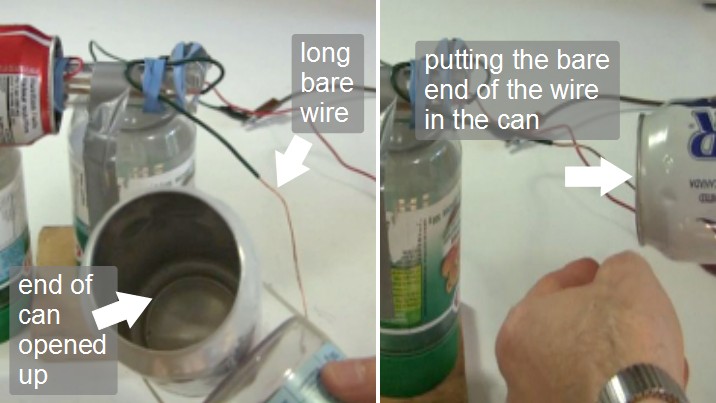
Tip - Use a second can or dome for the motor side too as shown below. An easy way to do this is to open the end of a can and to bare a long length of the brush's wire. Make sure the bared end is long enough that when you put it in the can, it will make contact with the inside in multiple places. The wire must connect to the INSIDE since this is making use of the Faraday ice pail or Faraday cage effect. Check that the can doesn't have a thick insulating coating inside. I found that cans like the ones in the photos below do have an insulating coating but it didn't interfere with it working so I didn't remove the coating.
Tip - Use your body as the ground by connecting the other end of the wire coming from the brush to a large piece of aluminum foil that you can hold in your hand. The more contact it makes with your skin the better. I've gotten good results just holding the bare end of the wire between my thumb and finger.
WARNING: If you have a large Van de Graaff and you do this and you touch the dome with your other hand, then you'll have created an electrical circuit through your body. With a very large Van de Graaff (e.g. 15" diameter dome) or someone with a weak heart this can be dangerous.
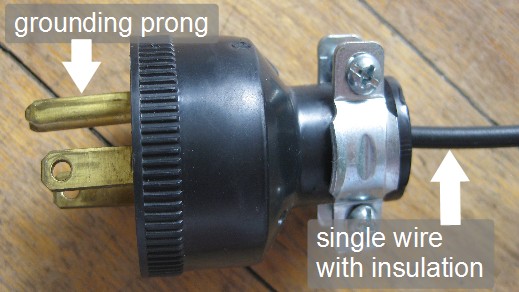
Tip - Make a grounding plug by buying an empty plug at a hardware store and connecting a single wire to the grounding prong. In the photo below you can see that in North America it's the long, round prong. Then plug it in and connect to this wire.
WARNING: Do this only if you are familiar with household wiring. Check first that the socket you'll be plugging it into has a good ground hole. My place is old and has only one good socket for these purposes.
You can see all the above grounding tips starting at 2:52 in my "How to Make a Van de Graaff Generator Part 2" video below.
Q. Can I use batteries to run my motor?
The answer depends on your motor. For example, my small commercially made Van de Graaff has a motor that runs off of 1.5 volt batteries and can turn the belt. But I've found a lot of 1.5 volt motors in stores that can't turn the belt. So not all 1.5 volt motors are the same. I think it's because some have more windings on their coils than others. You can see my comparison in my "How to Make a Van de Graaff Generator Part 2" video shown above at around 10:10.
Unfortunately the only way I know to pick the motor is to try it. You can guess that a larger 1.5 volt motor would be stronger that a smaller 1.5 volt motor, but that won't always be the case as some are made for high speed and some for slow turning power. There usually isn't enough information to choose without trying it. Also, The load on the motor is the belt and everyone's belt will have a different amount of tension and often a different width.
