
Worm castings are worm poo - there's no simpler way of putting it. But it makes good fertalizer for plants. Harvesting worm castings means removing it from the bin for making use of.
There are many ways to harvest worm castings:
1. dump and sort
2. let the worms do the sorting
3. divide and dump
4. alternate containers
5. mechanical harvester
I talk about each of these methods near the bottom, though I've
tried only the first two.
After two years of worm composting the layer of worm castings at the bottom of my bin was getting fairly deep. This meant that the layer of bedding at the top of the bin was getting thinner and allowing odors to get out easier. So I decided to harvest some worm castings.
The method I used was to dump and sort, described below.
|
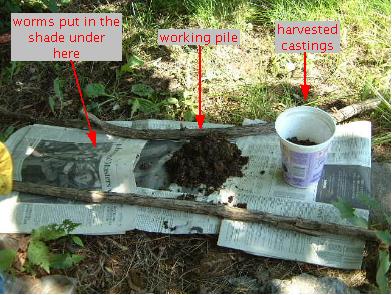
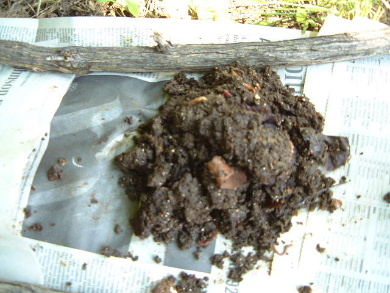
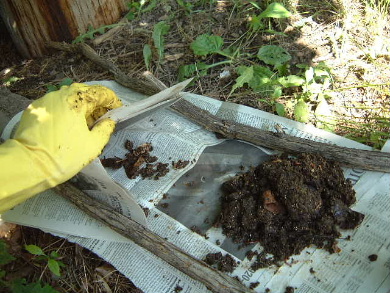
Gently scoop out some material from the worm bin and dump it in a pile(s) on a piece of newspaper or plastic. The newspaper will probably soak through so only use newspaper if that's okay. The material consists of much more than just the worm castings: castings, worms, leaves, bits of newspaper, worm cocoons, ... Your job is to separate out just the castings from rest and put the rest back in the bin. Worm cocoons are basically worm eggs from which baby worms will hatch. They look like small 3mm (1/16") diameter shiny beeds.
The worms will make this job easier for you because they hate light. Any worms on the top of your pile will immediately head deeper down into the pile, leaving the top worm free.
Have a shaded area for any worms that you do remove from the pile.
|
|
With the above method, I can fill the small half litre yogourt container in about 10 to 15 minutes. Since I use newspaper for my bedding, the last thing I did was to tear up the newspaper and add it to the bin.
Here's a video of the whole process.
Worm castings harvesting methods
1. Dump and sort
This is the method described above.
2. Let the worms do the sorting
The worms go where the food is. So don't put any food in one area of your bin for a month or two and any worms in that area will leave for areas that do have food. Voila. After the month or two is up, remove the worm castings.
I did try this once, but even after a few months, there were still plenty of worms in that selected area. But, many others have had success with this method.
3. Divide and dump
This is the simplest of all methods. Simply take material from one area of your bin, worm castings, worms, cocoon, et al, and dump it in your garden. Put fresh bedding in the area that you removed the material from.
4. Alternate containers
Have more than one worm bin. After one is full of food, leave it alone and start using another one. After all the food has been consumed, simply dump the contents of the bin in your garden, add new bedding and food along with some worms from another bin.
5. Mechanical harvester
The material from your bin should be fairly dry for this to work. This uses a drum or cylinder which sits on it's side, angled slightly downward. You put the material to be harvested in the drum near the top and then rotate the drum. As you do so, the castings separate from everything else. Near the bottom edge of the drum is a mesh or grate which allows the worm castings to fall through into a container. Some other material may fall through too, such as small worms and worm cocoons. I've never tried this method myself.
