There are a number of things that I do to help the worms survive the winter:
- partially bury the worm composting bin for warming in winter,
- use geothermal heating,
- insulate the bin to conserve heat generated by composting
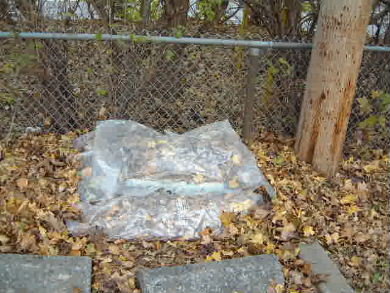
Plastic covered, insulating dry leaves for winter...
 |
|
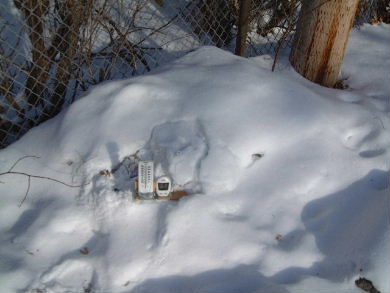
... and covered in a nice insulating layer of snow...
 |
|
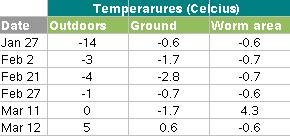
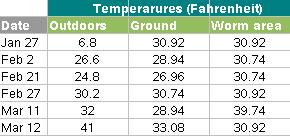
March 17, 2008 - Outdoors=0C (32F). Ground=0.6C (33F).
Worm area=7.1C (45F)
 |
|
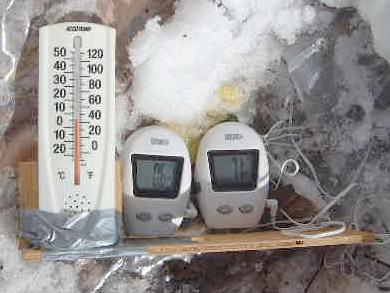
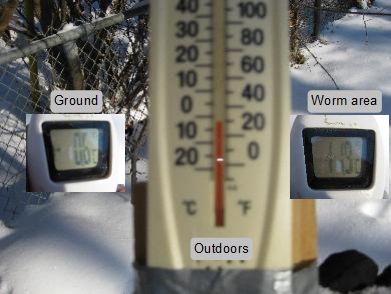
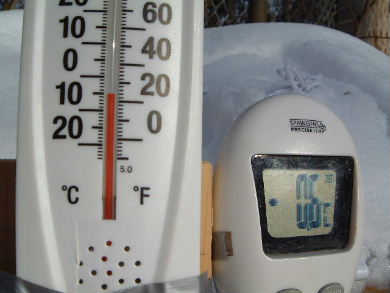
January 19, 2011 - Outdoors=-7C (19F). Ground=-0.6C (31F).
Worm area=11.9C (53F)
 |
|
Temperature measurement method and results
See the main temperature control page
for suggestions for making temperature measurements.
Winter - January 19, 2011
As with previous winters, I no longer use my worm bin once outdoor
temperatures go below freezing. Instead I do what in
Ontario we call green bin composting, basically composting
through a citywide program. The following measurements were
made on January 19, 2011, in the middle of winter since previous
ones weren't made until March. The warmer worm bin temperature,
11.9C (53F) when compared to the March 2008 measurement of 7.1C
(45F) despite the colder ground and outdoor temperatures is probably
due to my having put more food in the bin prior to leaving it for
the season.
These measurements are promising for anyone who would like to do
worm composting in a winter greenhouse to help keep the greenhouse
warm. Keep in mind, this worm bin is partially buried in ground
that is at -0.6C (31F) and so there is a lot of heat loss to the
ground. In a greenhouse, the surrounding temperature may be warmer.
January 19, 2011 - Outdoors=-7C (19F). Ground=-0.6C (31F).
Worm area=11.9C (53F)
|
|
Winter - March 17, 2008
Having learned from the winter of 2007 (see Winter 2007 subsection below), I decided not
to open the bin in 2008 unless the outdoor temperature was above freezing (0C, 32F).
2007 was amazingly warm, we had snow only in February! 2008 was more
like the old days with snow from December to March. So in December, I put lots
of food and dry newpaper for insulation and left it. As of this date, March 17, I
still haven't opened it,
and as you can see by the temperature measurements below, the worms may very well
be active!
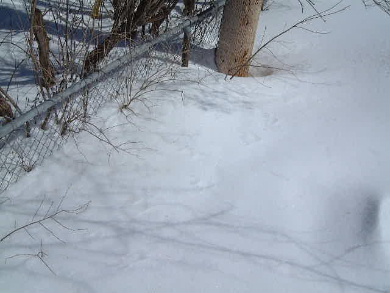
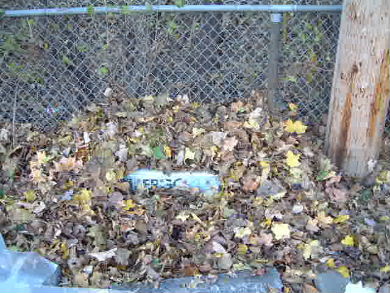
March 17, 2008 - The buried bin. Notice how little of the
chicken wire fence is showing.
 |
|
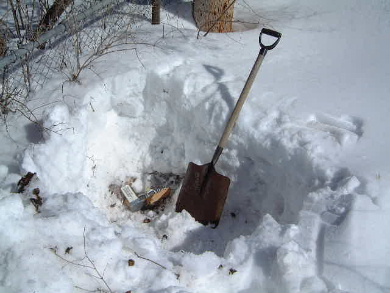
March 17, 2008 - The hole dug to get at the ends of the
wires for the remote thermometers. The bin is buried by about 60cm (2 feet) of snow.
 |
|
March 17, 2008 - Outdoors=0C (32F). Ground=0.6C (33F).
Worm area=7.1C (45F)
|
|
Actually, for the first five minutes after having dug the hole, the ground
temperature was 3.4C (38F) and the worm area temperature was 9C (48F). But it
took me about 10 minutes for the mercury thermometer to reach outdoor temperature
and so I had to wait to take the photo. By then, the temperatures had cooled
to those in the above photo. Needless to say, I quickly filled in the hole
afterwards.
Spring - April 7, 2008
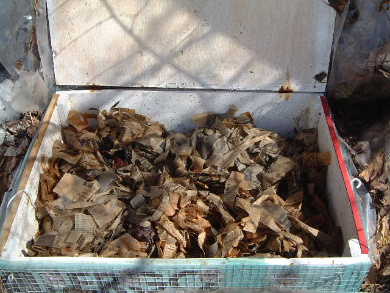
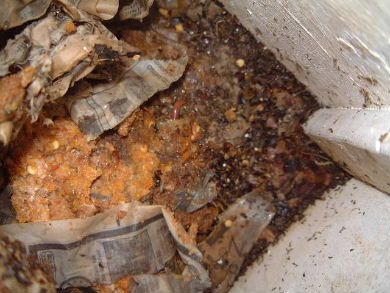
Finally, on April 7th I opened the bin. It was filled with wet newspaper, understandable
since I'd put a lot in the fall for insulation. And as you can see from the photo,
the worms were plentiful and big and there was plenty of food left. I removed about 3 inches
of wet newspaper and put on a fresh layer of dry. Ready for the summer.
April 7, 2008 - The opened bin... with an inch or two of
wet newpaper already removed.
 |
|
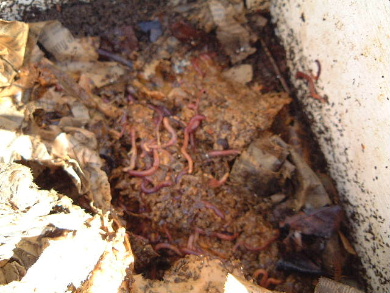
April 7, 2008 - And the worms are plentyful!
 |
|
Winter - 2007
January 26, 2007 - Measuring the outdoor temperature and the
temperature in the worm area.
 |
|
January 26, 2007 - The worms.
 |
|
The following measurements show that even though it was much colder outdoors,
the temperature in the area where some of the worms were was fairly constant,
even if a bit below freezing. It turns out that the material in the bin did
freeze starting from the top down. By the time of the measurements, the
remote temperature sensor was in an area that did freeze. There were still
about two or three inches of depth below that that did not freeze.
I did have to stop putting banana peels in the bin as it was too cold for
microbes to break them down. When I realized this, I switched from putting
raw food in the bin to blending the food in a
blender first to make it bite sized for the worms.
Also, at one point I realized that each time I opened the bin to put food
in, the next time I looked at that area it would be frozen. The act of exposing
that area to freezing temperatures caused it to loose what little heat it
had. I then simply put a lot of blended food into the bin and left it closed
until warmer weather.
When spring came, whichever worms and cocoons survived flourished immediately,
filling the bin.
Bury the worm composting bin
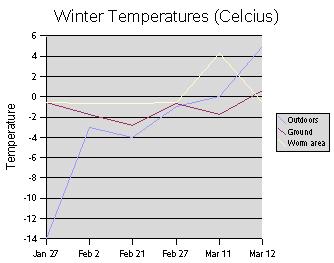
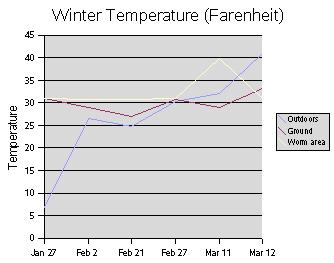
The temperature under the ground is fairly constant day to day as the charts on this
page show. It's warmer than the surface in winter.
Burying the composting bin means that the bottom and sides of the bin will be at
the temperature of the ground.
In my case I live in an apartment building and given people's squirmishness
about compost smell (non-existant) and worms, I really have only one location at
the end of our parking lot farthermost from the building. Unfortunately, when digging,
about 70mm (3 inches) down, I ran into some very thick and healthy roots that I didn't
want to cut. Heck, even if cutting them wouldn't normally bother you, the trees
they're attached to are providing my shade! To make up for the lack of depth I
piled up soil around the bin but it would still be best if it were buried deeper.
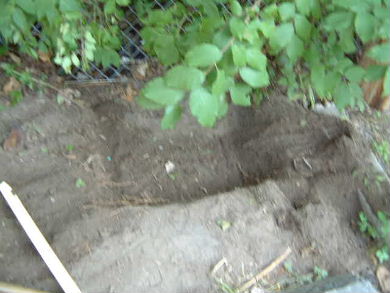
The hole for my bin. In the bottom, left of the picture
you can see the level which I used to get a nice flat surface for under the bin.
I wanted as much as possible of the bottom of the bin to be in contact with the
ground for maximum heat conduction.
 |
|
Note that before burying the bin I first wrapped plastic, I had a roll of polyethylene
handy, around the bottom and most of the sides of the bin for waterproofing.
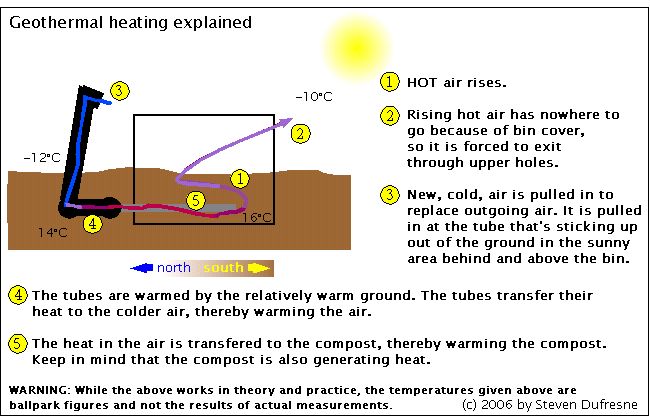
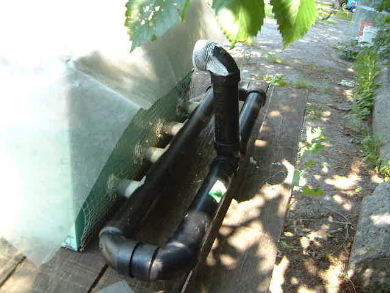
Geothermal heating
Worm compost bins need ventilation - but who wants cold winter air?!
So for my air intake, which are the lower holes in the back of my bin, I use
air that first circulates through buried tubes to be heated
in winter by the surrounding ground as the following illustration shows.
The tubes connected to the bin's lower air holes.
 |
|
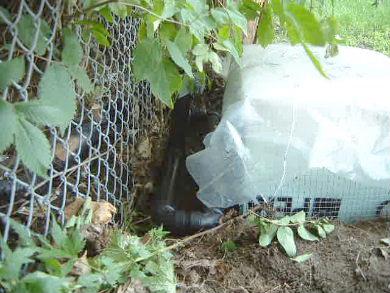
The tubes in the hole before they were buried.
 |
|
Full details on the construction of the tubes can be found by clicking here.
The longer the tubes are the better. However, the tubes should be long enough only
to heat the air to the desired temperature. If the tubes are too long then
there could be too much friction for the air to be pulled in at all. Instead it
will be stagnant and very little air will enter from them. Mine are probably shorter
than I'd like but I don't own my property and can do only so much.
Also, the winter frost line around here (Ottawa, Ontario, Canada) is
roughly around 1.2 metres (4 feet) so my bin and my tubes are not deep
enough for this to really work in the winter. It should be below the
frost line. You'd probably be better
off insulating the bin very well instead and keeping it above ground.
That way the heat generated by the composting will stay inside the bin more
and less will leak to the frosty ground. But as my worms did survive the winter,
it either worked or did no harm. In case it fails, it's a good idea to
make a mini-bin as backup.
Insulate the bin to converve heat generated by composting
When the temperatures started to drop below 0C (32F) I insulated
the bin to retain any heat generated by the composting. To do this I did two things.
First, I kept the bin filled to the top with loose bedding (shredded newspaper.)
The newpaper closer down to the worms is kept moist to the worms liking but the
newpaper higher up is kept dry for better insulation.
Second, I packed dry leaves all around the parts of the bin that aren't buried.
I used leaves because they were free, plentiful, and environmentally friendly.
The leaves have to be dry to act as good insulation so I covered them with
plastic. The plastic is stapled to the bin at the top and tucked in under
the leaves further from the bin. Though the cover also has leaves I made sure
it can still open. The air instake remains in the back, with fly mesh and
and plastic shield to keep out rain, and the fly mesh covered air out holes
remain in the front.
Before covering the leaves with plastic.
 |
|
With the plastic.
|
|