
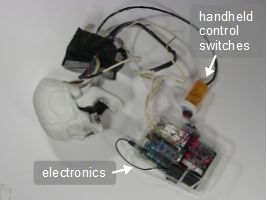
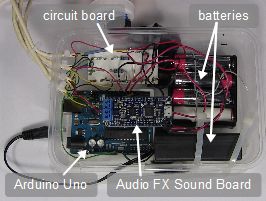
I decided to improve the sound in my Arduino controlled skull, ScareDuino, by using an Adafruit Audio FX Sound Board instead of the Arduino's 1980s style tone() function. You can hear the difference in the video below where the first sound I play uses the Sound Board and the second uses the tone() function.
|

|
|
Note that Adafruit has discontinued this board until they have figured out a problem with the amplifier. They suggest using their Audio FX Mini Sound board with one of their their class D audio amplifiers instead. I haven't had any problems with the board myself, though I have noticed that calling reset() in the setup for the Arduino code causes problems so I simply don't do that.
Video -
This video shows the new ScareDunio with the Adafruit Audio FX Sound Board in action, as well as a wealth of information on how to use the Sound Board so you can use it to add sound to your own projects.

|
See here for details about how the rest of the skull was made, including the servo motor for the jaw, the eyes that light up, the skull itself, all the other electronics and how it's all attached to a backpack. |
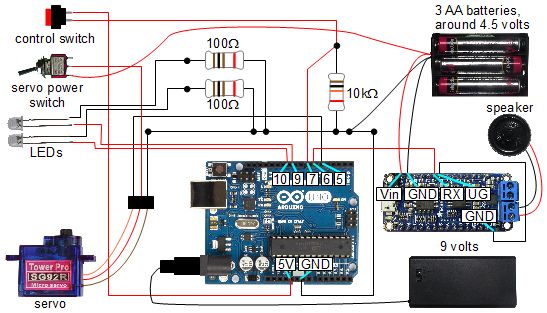
Ardunio/Adafruit Audio FX Sound Board ScareDuino circuit diagram
Here's the circuit diagram. Note the wiring for the Audio FX Sound Board. More details about the rest of the components can be found on the page all about the original ScareDuino.
|
Programming the Audio FX Sound Board in UART mode
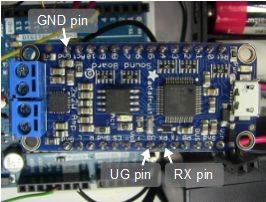
To control the Audio FX Sound Board from an Arduino you first need to put it in UART mode. In UART mode you can communicate with it using serial commands, or more specifically an Arduino library which you can download from the Adafruit website.
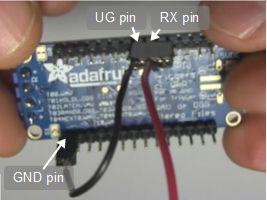
To put it in UART mode you simply connect the Sound Board's UG pin to a ground pin (GND pin) and restart the board. You can see this in the photos below and in the above circuit diagram.
|
|
There is also sample code on the Adafruit website but below is the code I wrote for the ScareDuino demonstrated in the above video. I put 5 sounds on the board, each with a different filename, and then have the Arduino use serial commands to tell the Sound Board to play a different one each time I press a switch. I simply cycle through the sounds. After playing the last one, the next time I play the first one again.
Note that the biggest mistake people make when controlling the Sound Board in this way is to use an incorrectly formated filename. It must be exactly 11 characters long, the last three being the filetype, either "WAV" or "OGG". If the part before the filetype is less than 8 characters then it must be padded out with spaces such that it is 8 characters.
Here are some correct examples:
GHOSTOOOWAV
ILBEBACKOGG
SCREAM  OGG
HI_GANG OGG
Here are some incorrect examples:
HI_GANGWAV
GHOSTHOWLWAV
ILLBEBACKOGG
And here's the code i.e. the Arduino sketch for my ScareDuino.
/* When a switch is closed: - turn on two LEDs, - start the next sound in the sequence and - use a servo to open the jaw and then close the jaw after a time that matches the length of time for the sound. The motor also has a switch that the Arduino doesn't know about that controls power to the servo. If that switch is off then the jaw simply won't work. */ #include#include #include "Adafruit_Soundboard.h" // Choose any two pins that can be used with SoftwareSerial to RX & TX #define SFX_TX 3 #define SFX_RX 6 // Connect to the RST pin on the Sound Board #define SFX_RST 4 // You can also monitor the ACT pin for when audio is playing! // we'll be using software serial SoftwareSerial ss = SoftwareSerial(SFX_TX, SFX_RX); // pass the software serial to Adafruit_soundboard, the second // argument is the debug port (not used really) and the third // arg is the reset pin Adafruit_Soundboard sfx = Adafruit_Soundboard(&ss, NULL, SFX_RST); // can also try hardware serial with // Adafruit_Soundboard sfx = Adafruit_Soundboard(&Serial1, NULL, SFX_RST); #define JAW_DEGREES_CLOSED 0 // degrees when jaw is closed #define JAW_DEGREES_PARTWAY 20 // degrees when jaw is partly open #define JAW_DEGREES_OPENED 40 // degrees when jaw is fully open Servo servo; int servoPin = 5; int switchPin = 7; int led1Pin = 9; int led2Pin = 10; boolean lastSwitch = LOW; boolean currentSwitch = LOW; #define NUM_SOUNDS 5 // The names of the found files. // Note that they are 8 characters followed by a 3 character file // type (.OGG or .WAV). Spaces are inserted to make up the // 8 characters as needed. char *soundName[NUM_SOUNDS] = { "HI_GANG OGG", "GROWL OGG", "GHOSTOOOOGG", "SCREAMHPOGG", "ILBEBACKOGG" }; // these lengths are less than they really are due to the // time it takes to get to the code where the delay() is done int soundLength[NUM_SOUNDS] = { 1240, 510, 1300 , 1600, 190 }; // offsets of the sounds into the above arrays #define SOUND_HI_GANG 0 #define SOUND_GROWL 1 #define SOUND_GHOST 2 #define SOUND_SCREAMHP 3 #define SOUND_ILBEBACK 4 int currentSound = 0; void setup() { servo.attach(servoPin); pinMode(switchPin, INPUT); pinMode(led1Pin, OUTPUT); pinMode(led2Pin, OUTPUT); digitalWrite(led1Pin, false); digitalWrite(led2Pin, false); servo.write(JAW_DEGREES_CLOSED); // softwareserial at 9600 baud ss.begin(9600); } boolean debounce(boolean last) { boolean current = digitalRead(switchPin); if (last != current) { delay(5); current = digitalRead(switchPin); } return current; } void loop() { // get the control switch's position currentSwitch = debounce(lastSwitch); if (lastSwitch != currentSwitch) { // the switch position changed lastSwitch = currentSwitch; if (currentSwitch == HIGH) { // the switch was turned on so: // - turn on the LEDs for the eyes // - open the jaw // - play a sound and wait for it to finish digitalWrite(led1Pin, true); digitalWrite(led2Pin, true); servo.write(JAW_DEGREES_OPENED); sfx.playTrack(soundName[currentSound]); // wait some amount of time based on which sound is playing switch (currentSound) { case SOUND_HI_GANG: // by the time we get to this code it's already time // to move mouth servo.write(JAW_DEGREES_PARTWAY); delay(300); servo.write(JAW_DEGREES_OPENED); delay(soundLength[currentSound]-300); break; case SOUND_ILBEBACK: // by the time we get to this code it's already time // to move mouth servo.write(JAW_DEGREES_PARTWAY); delay(300); servo.write(JAW_DEGREES_OPENED); delay(100); servo.write(JAW_DEGREES_PARTWAY); delay(300); servo.write(JAW_DEGREES_OPENED); delay(100); break; default: /* for SOUND_GROWL, SOUND_GHOST, SOUND_SCREAMHP */ delay(soundLength[currentSound]); } // The sound is finished so: // - close the jaw // - turn off the eye LEDs servo.write(JAW_DEGREES_CLOSED); digitalWrite(led1Pin, false); digitalWrite(led2Pin, false); currentSound++; if (currentSound == NUM_SOUNDS) currentSound = 0; } } }
|
|
