For halloween I thought I'd make a robotic skull called ScareDuino
that I could wear on my shoulder as a 2nd head, and that'd be
controlled by an Arduino. A servo opens and closes the jaw, LEDs light
up the eyes and a speaker makes a scary sound. All this is activated
by a switch I hold in my hand.
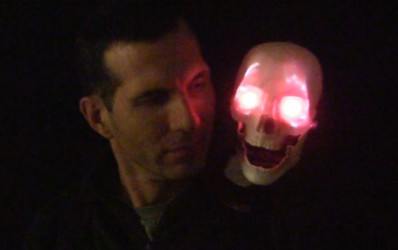
Shoulder mounted Arduino controlled skull.
 |
|
What it looks like with the lights on.
 |
|
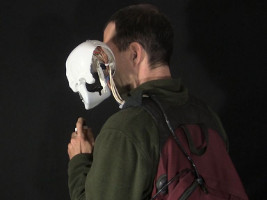
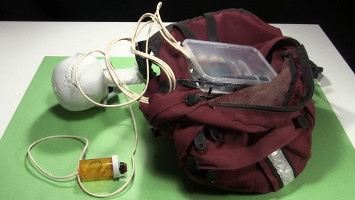
View of the backpack.
 |
|
Before putting it in the backpack.
 |
|
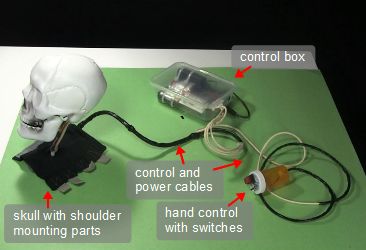
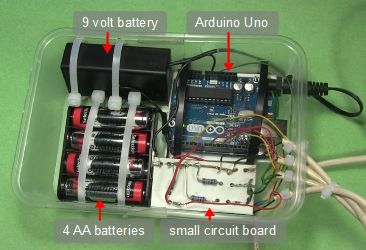
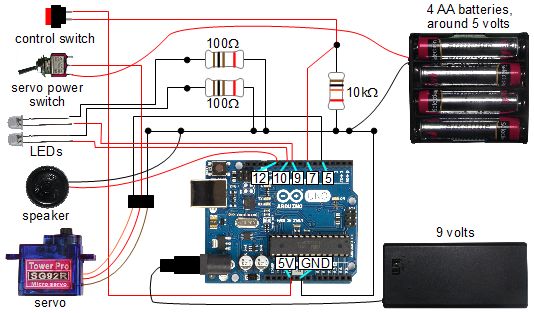
Below is shown all the parts and a circuit diagram. The control box
contains an Arduino Uno,
a 9 volt battery to power it, a small circuit board with some resistors
and around 5 volts of AA batteries connected in series to power the servo.
The parts without the backpack.
 |
|
Inside the control box.
 |
|
The circuit diagram.
 |
|
|
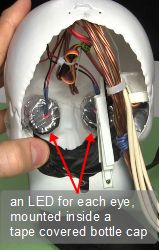
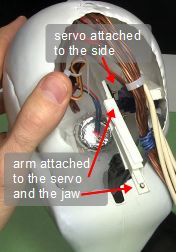
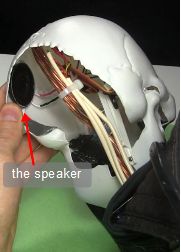
Below you can see the inside of the skull from the back. The eyes are
each an LED inside bottle caps with aluminum tape wrapped around the
back of them to prevent too much light from going anywhere except
forward. The servo is a small one that works a lever arm that's attached
to the back of the jaw. And the speaker is a small electromagnetic one
taken from a gift card.
The LED eyes.
 |
|
The servo and jaw arm.
 |
|
The speaker.
 |
|
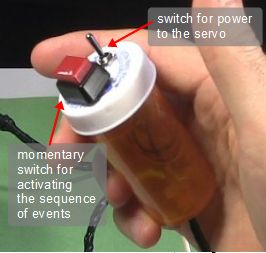
The hand control is simply a momentary switch and an on/off switch.
When the momentary switch is pressed the Arduino begins its sequence
of activity, which runs for a fix period of time. If the momentary switch
is released before that time is elapsed then the activity is ended
sooner. The other switch is for cutting off power to the servo for
times when it's not in use, to save battery power.
The hand control.
 |
|
|
The sound vs motor challenge
To open and close the jaw I wanted to use a servo since it was such
a simple and low torque action and a servo suits that well. A DC motor
requires an H-bridge and possibly some sensors and more complex code,
and a stepper too requires more complex code.
I knew of two sound libraries, the first being
Talkie on github.com which I also go into detail on
here on my Arduino speech synthesizer page
and the second being
Mozzi on github.com. Talkie gives a compilation error if you include
Servo.h in your Arduino code which means I couldn't use it with a servo.
Mozzi looks like it might work with more motors than
Talkie but requires an abstraction layer which I didn't want to
use since I wanted to keep it simple and learn vanilla Arduino.
Luckily the Ardunio comes with the tone() function which allows
you to use simple PWM to make sounds with just an attached speaker
and a resistor if needed. The sound is like the old 8-bit sound
but did the job. And it doesn't conflict with the servo library.
The Arduino source code
Below is the source code for this Arduino skull project. It's also in
this downloadable file
scareduino_arduino_controlled_skull.zip.
The actions may seem simple, but couldn't be written with a loop()
function that was simply a sequence of actions and sleeps (calls to
delay().) Instead it had to be a proper microcontroller loop function
that doesn't sleep so that if the switch was released at any time,
the jaw would start closing. So the loop instead checks the switch
positon and then goes into a state machine to see what to do next.
The sound is pretty simple, consisting of a rising frequency while
the jaw is opening, followed by a constant frequency while the jaw
is open, and then a falling frequency while the jaw is closing.
However, since it uses the tone() function, all sorts of funky
sound manipulations could be done, possibly under the control of
an array of frequencies and durations.
/*
ScareDuino - Scarey skull controlled by an Arduino.

When a switch is closed this:
- turns on two LEDs,
- starts playing a sound at a certain minimum frequency and
- starts opening the jaw, but does so in small steps.

While the jaw is still opening this:
- continues to increase the sound frequency and
- continues to open the jaw in small steps
until a certain time is up.

The jaw is left open and the sound continues playing for
a predetermined period of time.

When that time is up this:
- starts decreasing the frequency and
- starts closing the jaw in small steps
until the same time as was used for opening is up.
When the time is up this:
- turns off the sound
- turns off the LEDs.

At any time during the above process, if the switch is
opened, then the LEDs and sound are turned off and the
process of closing the jaw in steps is begun.

The motor also has a switch that the Arduino doesn't know about
that controls power to the servo. If that switch is off then the
jaw simply won't work.

NOTE: tone() causes interference with pins 3 and 11.

To see it in action, go to:
http://rimstar.org/science_electronics_projects/arduino_controlled_skull_scareduino.htm
*/
#include

Servo servo;
int servoPin = 5;
int switchPin = 7;
int led1Pin = 9;
int led2Pin = 10;
int speakerPin = 12;

boolean lastSwitch = LOW;          // these are used for debouncing the switch
boolean currentSwitch = LOW;

#define JAW_DEGREES_CLOSED    0    // degrees when jaw is closed
#define JAW_DEGREES_OPENED    40   // degrees when jaw is fully open
#define JAW_TIME_STEP_SIZE    100  // time each step should take (msec)
#define JAW_DEGREES_STEP_SIZE 5    // degrees to move each step
#define JAW_TIME_TO_LEAVE_OPEN 2000 // how long to leave the jaw open (msec)
// states for the state machine below
#define JAW_OPENING 1
#define JAW_OPEN    2
#define JAW_CLOSING 3
#define JAW_CLOSED  4
int jawState;   // current state: JAW_OPENING, JAW_OPEN, JAW_CLOSING, JAW_CLOSED
int jawDegrees; // current angle of the servo
unsigned long jawStateTargetDegrees; // The angle we're trying to get the
                                     // servo to before stopping (fully open
                                     // or fully closed).
unsigned long jawStateTargetTime;    // The time when the next action should
                                     // happen. Just what that action is
                                     // depends on the current state. This
                                     // prevents us doing something every single
                                     // time through the loop.
                                     // Example: While the jaw is opening, the
                                     // actions are to open the jaw a little bit
                                     // more and increase the sound frequency.

#define TONE_START_FREQ 130          // The sound frequency to start at when
                                     // starting to open jaw.
unsigned int curToneFreq;            // the current sound frequency

void setup()
{
  servo.attach(servoPin);
  pinMode(switchPin, INPUT);
  pinMode(led1Pin, OUTPUT);
  pinMode(led2Pin, OUTPUT);
  digitalWrite(led1Pin, false);
  digitalWrite(led2Pin, false);
  pinMode(speakerPin, OUTPUT);

  // when the Arduino is first turned on, close the jaw
  servo.write(JAW_DEGREES_CLOSED);
  jawDegrees = JAW_DEGREES_CLOSED;
  jawState = JAW_CLOSED;
}

boolean debounce(boolean last)
{
  boolean current = digitalRead(switchPin);
  if (last != current) {
    delay(5);
    current = digitalRead(switchPin);
  }
  return current;
}

void loop()
{
  // get the control switch's position
  currentSwitch = debounce(lastSwitch);
  if (lastSwitch != currentSwitch) {
    // the switch position changed
    lastSwitch = currentSwitch;
    if (currentSwitch == HIGH) {
      // the control was switch turned on
      digitalWrite(led1Pin, true); // turn on the LEDs
      digitalWrite(led2Pin, true);
      curToneFreq = TONE_START_FREQ; // start the sound
      tone(speakerPin, curToneFreq);
      jawState = JAW_OPENING; // start opening the jaw
      jawStateTargetTime = millis() + JAW_TIME_STEP_SIZE;
      jawStateTargetDegrees = JAW_DEGREES_OPENED;
    } else {
      // the control was switch turned off
      digitalWrite(led1Pin, false); // turn off the LEDs
      digitalWrite(led2Pin, false);
      noTone(speakerPin); // turn off the sound
      jawState = JAW_CLOSING; // start closing the jaw
      jawStateTargetTime = millis() + JAW_TIME_STEP_SIZE;
      jawStateTargetDegrees = JAW_DEGREES_CLOSED;
    }
  } else {
    switch (jawState) {
      case JAW_OPENING:
        if (millis() >= jawStateTargetTime) {
          // It's time to do some more work for opening the jaw.
          if (jawDegrees + JAW_DEGREES_STEP_SIZE < jawStateTargetDegrees) {
            // The jaw isn't fully open yet so open the jaw
            // a little more and increase the sound frequency.
            jawDegrees += JAW_DEGREES_STEP_SIZE;
            servo.write(jawDegrees);

            curToneFreq++;
            tone(speakerPin, curToneFreq);

            jawStateTargetTime = millis() + JAW_TIME_STEP_SIZE;
          } else {
            // We're done opening the jaw. Keep it open for a while.
            jawState = JAW_OPEN;
            jawStateTargetTime = millis() + JAW_TIME_TO_LEAVE_OPEN;
          }
        }
        break;
      case JAW_OPEN:
        // Check if it's time to start closing the jaw.
        if (millis() >= jawStateTargetTime) {
          // It's time to start closing the jaw.
          jawState = JAW_CLOSING;
          jawStateTargetTime = millis() + JAW_TIME_STEP_SIZE;
          jawStateTargetDegrees = JAW_DEGREES_CLOSED;
        }
        break;
      case JAW_CLOSING:
        if (millis() >= jawStateTargetTime) {
          // It's time to do some more work for closing the jaw.
          if (jawDegrees - JAW_DEGREES_STEP_SIZE > jawStateTargetDegrees) {
            // The jaw isn't fully closed yet so close the jaw
            // a little more and decrease the sound frequency.
            jawDegrees -= JAW_DEGREES_STEP_SIZE;
            servo.write(jawDegrees);

            curToneFreq--;
            tone(speakerPin, curToneFreq);

            jawStateTargetTime = millis() + JAW_TIME_STEP_SIZE;
          } else {
            // We're done closing the jaw so turn off the LEDs and the sound.
            digitalWrite(led1Pin, false);
            digitalWrite(led2Pin, false);
            noTone(speakerPin);

            jawState = JAW_CLOSED;
          }
        }
        break;
      case JAW_CLOSED:
        // we have nothing to do
        break;
    }
  }
}
Video - ScareDuino - Arduino controlled Skull with Servo, LEDs, Speaker
The following video shows ScareDuino in action and goes over the
various parts.
Video - How to Make ScareDuino - Arduino controlled Skull with Servo, LEDs, Speaker
This video goes through step-by-step how this Arduino controlled skull
was made.


