Solar air heating (solar furnace)
Solar air heating involves using the sun either to heat outdoor air and bring it into a building or to heat the indoor air without introducing new, fresh outdoor air. The latter is the most frequent case, probably due to the fact that it's easier to start with the already room temperature indoor air. See the solar air heater manufacturers page for photos and some details of commercially available solar air heaters. Below you can find information of work done by DIYers who made their own solar air heaters. That's followed by exhaustive details all about solar air heaters in general. Note that solar air heaters are also referred to as solar furnaces.
DIY/homemade solar air heaters (or commercial ones I installed)
Types of solar air heaters
Over the last few years DIYers have mostly settled on a few types of solar air heaters to make. See this page on types of DIY solar air heaters for details and diagrams of what those are. If you're completely new to solar concepts such as what glazing or an absorber is then you might want to read the appropriate sections below for a basic understanding of these first.
Beware of solar air heaters that cover most or all of a window. See this page about window covering solar air heaters for more about this.
How it works (and construction tips)
In its most simple form, you need a material with a dark colored surface that the sun can shine on. This will cause the material to get hot. We call this material the absorber. You then have flowing air make contact with this hot material and take some of the heat from it. Arrange it so that this heated air ends up indoors and you're done! The rest are details of different ways to do it including discussion of absorbers, glazing insulation, ...
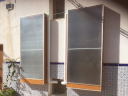
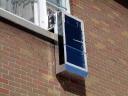
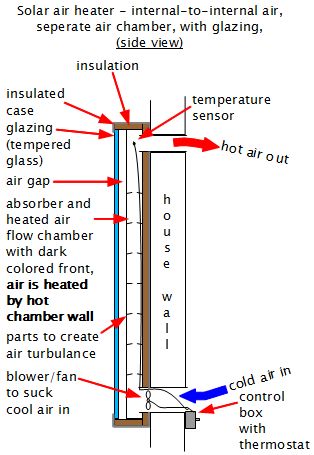
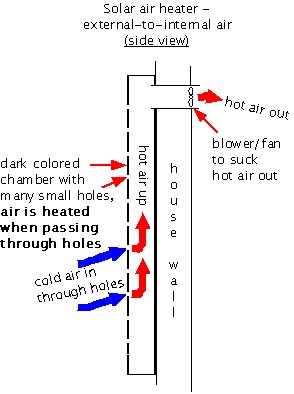
Figure 1 is an example of a very efficient one with all the bells and whistles. It sucks in relatively cold indoor air using the fan at the bottom. The air is pushed up the inside of an air flow chamber. The dark colored skin of the air flow chamber acts as the absorber and is heated by the sun (outdoors is on the left in the figure.) So while the air moves up the inside of the air flow chamber, it takes heat from the walls of the chamber. The now hot air exits the solar air heater at the top, reentering the building.
The absorber
The skin of the air flow chamber in Figure 1 is called an absorber. The absorber is the part that converts the energy from the sun to heat and transfers it to the air. You can get rid of everything except the absorber.
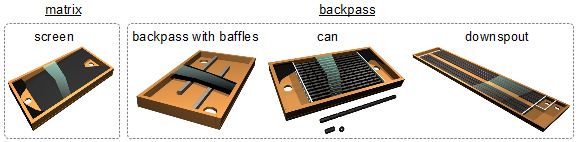
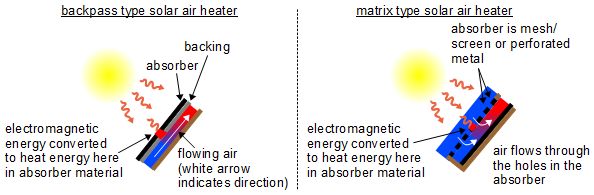
One type of absorber has the air flow behind it the entire time that the air is in the solar air heater. A solar air heater with this type of absorber is commonly called a backpass solar air heater. Figure 1 is an example of this. The other type of absorber has the air flow through holes in the absorber itself. A solar air heater with this type is commonly called a screen (or matrix) solar air heater. Figures 2 and 3 show variations of this type.
As long as the absorber is a dark color then it will absorb the sun's energy and turn it into heat energy. The measure of how much it absorbs is called its absorptivity. So you want high absorptivity. Everything also radiates energy in the form of electromagnetic waves. The hotter something gets the more it radiates. So the absorber also reradiates some heat back away from itself.
For homemade solar air heaters people usually use flat black paint. A high grade flat black latex paint has been shown to work just fine for solar air heaters, even when the absorber stagnates, i.e. has been allowed to get very hot by not having any air flow over it for long periods of time. If flat black is not available then you could always ask them to mix up a batch for you. Another option that's been tried and shown to work is the flat black paint for painting barbeques and radiators usually found a spray can form at your local hardware store. Its absorptivity can be as high as 94%1. I find that this paint on aluminium will last longer if the aluminium is cleaned very well first of all dirt and grease. This can be done with dish soap and very hot water.
Manufactured solar air heaters typically use a more expensive and hard to do coating but one that has high absorpivity and low emissivity (absorbs plenty and reradiates back little.) An example of this is black chrome, part of the process of which includes electroplating (a more difficult process than simply painting.) Its absorptivity ranges from .92 to .97 and its emissivity ranges from .8 to .252.
Another very good coating not normally available in hardware stores but that have very good properties for these purposes is HI/SORB-II from SOLKOTE.
For screen (or matrix) type solar air heaters where the absorber is a mesh that the air passes through usually window screen is used, either fiberglass or aluminum. Charcoal colored fiberglass or aluminum is good and available at hardware stores like Lowes and Home Depot. Personnally I prefer aluminum since I fear offgassing at high temperatures by the fiberglass, but many have use fiberglass without reporting any odors. Alternatively some have used soffits, which are in long sheets of metal with holes in them.
The absorber should be as thin as possible. Ideally it would consist of a very thin dark coating, backed by a very thin but solid material just to hold its shape. As the following diagram shows, the thin dark coating converts electromagnetic wave energy from the sun to thermal energy. This thermal energy should then be transferred as quickly as possible to the air to be heated. In a screen type solar air heater (absorber is a mesh/screen, perforated sheet) the air comes in contact with the dark coating itself as it passes through the holes in the absorber, taking the heat directly from it without having to first be transfered to an intermediate metal backing.
The glazing
One feature of the one in Figure 1 is the use of glazing, which is a fancy word for the glass or plastic material at the front. Why not skip the glazing and leave the air chamber in contact with outside air? A big reason is that this glazing keeps any moving, cold outdoor air from contacting the air flow chamber and stealing its heat. With the glazing you have a box that contains trapped air. This trapped air heats up and stays heated as long as the sun is shining and perhaps a little while afterwards. If the surface of the air flow chamber gets hotter than the trapped air then it will give up some of its heat to the trapped air. But at least it's hot trapped air and won't give up as much heat as it would to cold air.
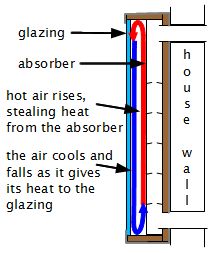
A rule of thumb for a backpass solar air heater (Figure 1) is to keep the distance between the absorber and the glazing small, 3/4 of an inch or less. If the spacing is too large then convection currents may form in the space (see diagram on left below.) These convection currents will steal heat from the absorber and transfer it to the glazing. Convection currents are where the hot air heated by contact with the absorber will rise since that's what hot air does, then at the top it will be forced forward and then flow down in contact with the cooler glazing where it will give up its heat. Once the air flows to the bottom it will move inward to the absorber where it will once again rise and steal more heat. Keeping the distance between glazing and absorber small here will limit convection currents from forming.
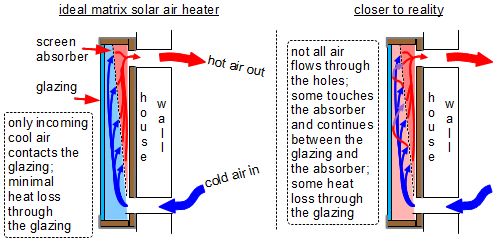
Ideally in a matrix style solar air heater the air flowing between glazing and the absorber is at the same temperature as the incoming air as shown in the diagram on the right above. If the incoming air is outdoor air then the conduction heat losses through the glazing would be nil since there would be no difference in air temperature on both sides. If the incoming air is indoor air then there would be some conduction loss due to the temperature difference. However, in reality and as shown in the diagram, not all of the incoming air will likely proceed through the holes in the absorber but some will contact the absorber, be heated, and remain to conduct heat away either by mixing with other air and/or contacting the glazing eventually.
Types of glazing
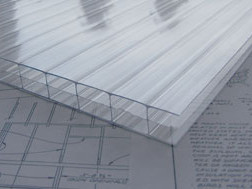
A very popular glazing for DIY solar air heaters (8'x4') is corrugated polycarbonate, available at many building supply stores such as Home Depot and Lowes. One brand of this glazing is the Suntuf corrugated polycarbonate corrugated panels. It has UV resistance.
Another popular glazing for DIYers is twinwall polycarbonate, also available at many building supply stores. Here's a greenhouse supply website that sells it. It also has UV protection. In the UK it can be found as Corotherm and is available at B&Q.

A special type of glass used for solar air heaters is tempered glass. Tempered glass doesn't break as easily as regular glass and if it does break, it shatters into many tiny pieces, so it's safer than regular glass. The side windows in cars are made of tempered glass. Also, tempered glass allows about 10% more light to shine through it than regular glass. This is called its transmissivity, a measure of how much light is transmited through it. This means more of the light will get to the absorber to be converted to heat. If you're making your own solar air heater, tempered glass is more expensive than regular glass and comes in a limited number of sizes (4 feet x 8 feet and that's about it.) You also can't cut or drill tempered glass, though glass retailer and installer companies will usually do it for you. Make sure you get low-iron glass since the iron reduces the transmissivity. So unless you're out for maximum efficiency and have a lot of money, you might go with regular glass or plastic instead.
According to Cansolair's website, they use LexanTM, for their glazing. Lexan is a polycarbonate and resin material that is very strong and flexible. Rather than being flat, the glazing on the Cansolair is rounded so that it wraps around the unit a bit, catching the sun for more hours of the day.
If you are going to use plastic (plexiglass, Lexan, ...) of some sort, look for some that is UV rated i.e. it will not degrade quickly from the ultraviolet rays of the sun.
Making the air contact the absorber
Ideally all the air would contact the absorber to take heat from it but that isn't likely to happen. With a screen type matrix solar heater all the air must pass through the small holes in the absorber and so will at least come very close.
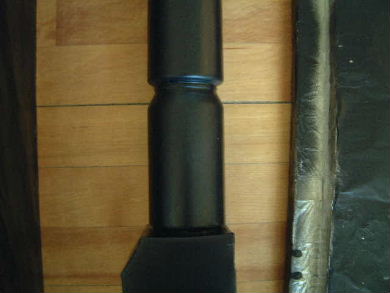
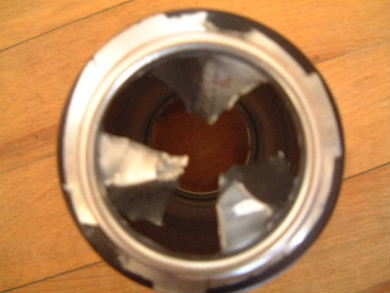
Another interesting feature of the Cansolair is that they make the air flow inside the air flow chamber in a turbulent manner. Instead of being nice straight flowing air, the air actually spirals or vortexes. Cansolair is so named because the air flow chamber is made up of pop/soda cans stacked one on top of the other. Where one can sits on top of another, one of the cans has been cut with an off-center hole that's only about half the size of what it could be, making the air take a convoluted path as it passes from one can to the next. The photos on the right are from my own mini-can solar air heater where I actually cut vanes in one end to achieve a similar thing.
Insulation (or not)
Notice in Figure 1 that there is insulation at the back of the panel as well as the top and the sides. This is to prevent heat loss.
What thickness should you use? In most solar air heaters the majority of the heat loss is through the glazing and so it's unnecessary to go overboard with insulating the sides and back. One inch is usually enough.
It's best not to use extruded polystyrene. My first homemade solar air heaters used pink solid extruded polystyrene. According to my research, if in contact with direct sunlight then it would offgass formaldehyde, not something I would want to be mixing with my indoor air. If you have a separate air flow chamber which prevents the air being heated from mixing with the air behind the glazing (i.e. a backpass solar air heater), this wouldn't be an issue except that the heated insulation offgassed something that fogged up the inside of my glazing, reducing the amount of sunlight hitting the absorber. Extruded polystyrene also has a melting point that is below the temperatures typically reached and so some have actually melted their insulation.
The most frequently used insulation for DIY solar air heaters is rigid board foil faced closed-cell polyisocyanurate, or just polyiso. It can handle temperatures up to 120C (250F) which should be just fine for homemade solar air heaters. You can get it from stores such as Home Depot and Lowes, sometimes under special order. In the UK look for KingSpan at builder's supplies.
Another good insulation to use is one made with a low-binder glass fibre. It's made with a high temperature glue that holds the fibres together. This glue will not offgass at the temperatures encountered. Unfortunately I don't know of a brand name but if you do, please let me know (my email address is at bottom of this page.)
A very high temperature insulation is stone wool insulation which is literally rock which has been made molten and then converted to fibers, such as by spinning at high speeds. It may contain a binder. This has working temperatures much higher than is likely needed for a solar air heater, greater than 260C (500F). Brandnames of these are ROCKWOOL and ROXUL.
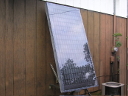
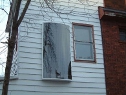
Notice in Figure 2 that there is no insulation at the back. The one in Figure 2 must be installed firmly against the building wall and will use some of the heat on the other side to heat the inside of the unit. Note, however, that if it is hotter inside the unit than it is inside the building then heat will flow from the unit directly through the wall and into the building, rather than heating the flowing air. If the wall around is cold too then heat may be lost to there too. This is a tradeoff.
See the insulation page for more about insulation in general and see the DIYer's insulation table for more types of insulation.
No glazing
Notice in Figure 2 that there is no glazing and so the absorber is in direct contact with the outdoors. A cold wind blowing over the surface of the outside of the absorber will cause heat to be pulled from the absorber surface. Many large commercial solar air heaters intended for covering the walls of factories and warehouses are made this way and refer to it as transpired solar air heaters. Their large absorber surface area allows them to convert a lot of sunlight to a lot of heat and so work quite well.
A mixed version
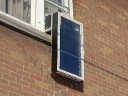
Figure 3 illustrates a mix of features from the solar air heater in Figures 1 and 2. It has glazing so the absorber doesn't loose heat to the outdoors directly. It doesn't have a separate air flow chamber as in Figure 1 but instead uses an absorber with holes for the air to flow through as in Figure 2. Personally I like the separate air flow chamber for homemade systems because I'm always worried about offgassing from the various materials, especially since those materials are being heated. With a separate air flow chamber you can isolate the air that is going into the house from the air that might be getting contaminated by materials. I might be overreacting though as many people use homemade solar air heaters without worrying about this issue.
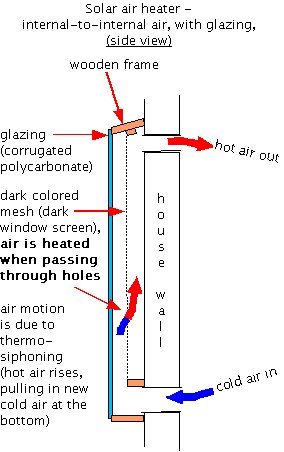
Figure 3 is actually a design by Gary Reysa that came from his article Build a Solar Heater in Home Power magazine, issuse 109, October/November 2005. It's made of simple to find materials. The absorber is actually black window screen. The glazing is made of clear Suntuf corrugated polycarbonate corrugated panels. The frame is attached to the exterior of the bullding wall and is made of wood.
Moving air by thermosiphoning
The solar air heater in Figure 3 doesn't use any fan to move the air but instead it uses something called thermsiphoning. This uses the fact that hotter air rises above cooler air. It works as follows. The unit in Figure 3 has a hole at the top and a hole at the bottom. Ignoring the holes, when the sun hits the absorber, the air will start taking the heat from the absorber and become hot. As you now know, hotter air rises above cooler air. In Figure 3 the only place that hot air has to go when it rises is through the top hole and into the building. But when that hot air exits through the top hole, new air has to take its place. So new air is automatically pulled in through the bottom hole. This new air is cooler than the hot air already in the unit. But now that it's there it too will heat up, rise and exit through the top therebye pulling new cool air at the bottom and so on... This process is called thermosiphoning.
Fan/blower versus thermosiphoning
So why use a fan at all? You don't have to if you don't want to since you can use thermosiphoning. However, if your absorber is always hot then that means you're not taking as much heat from it as you can. Ideally your absorber is cool because you're taking heat from it as fast as the heat is being produced.
Also, the hotter your absorber is the hotter the air between the absorber and the glazing will be. This will cause heat losses between that hot air and the glazing. As that air is cooled by these losses, it will be heated again by the absorber and lose that heat too and so on. Keeping the absorber cool means you're taking all the heat from it and reduces these losses to the glazing at the same time. Note that these losses to the glazing can be as described in this paragraph or through convection (illustrated above under the heading, The glazing.)
To illustrate this I can draw on my experience with installing flat panel solar pool heating systems. On a sunny day, with no water running through the panels, the panels can be too hot to touch. With water running through them, putting your palm against them you'll find that the panels are cold. But, the water coming out is hot! I've done this test myself many times. This is the same thing you should try for in a solar air heater.
When might you not want to run the fan when there's heat available from the absorber? If the room would get uncomfortably hot then you wouldn't want to take any heat from the absorber. It may also be possible that the available heat may be so small that you'd use less energy running your alternate heating system than the energy you'd use to run the solar air heater's fan.
In terms of sizing the fan, the general rule of thumb among DIYers is to have a fan that suppies 3 cubic feet per minute (3 CFM) for every square foot of collector. So if your collector is 32 square feet (8' x 4') then your fan should supply 96 CFM (3 x 32.) A more rigorous messure would include the depth of your collector too, but more collectors aren't very deep and this is just a rule of thumb.
Selectable input/output air path solar air heater
Rather than choose to take in outdoor or indoor air, the solar air heater can be built to work either way. That's what's proposed in the 1881 US patent 246,626 by Edward S. Morse entitled "Warming and Ventilating Apartments by the Sun's Rays", shown in the diagram below.
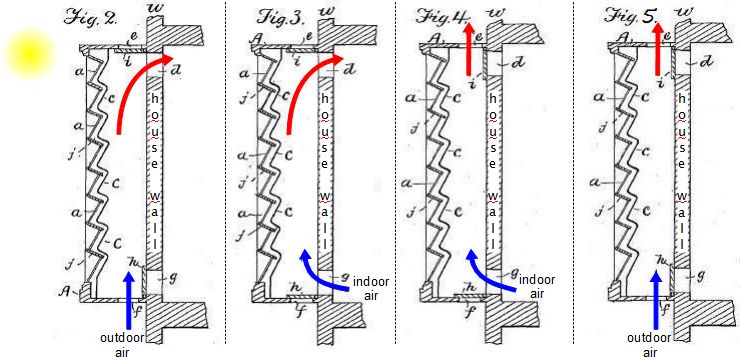
In Fig. 2 outdoor air is pulled into the solar air heater to be heated and then sent into the house. This is good for days when the temperature outdoors isn't so cold that the heater can't heat it up enough. In this way you get fresh air.
Fig. 3 is for when the outdoor air is too cold to be heated up sufficiently. The bottom vent is arranged such that already warmish indoor is pulled into the solar air heater.
Fig. 4 shows what you'd do on a summer day when it is already too hot indoors and you want to draw some of that hot air out. Since the air is hot in the solar air heater, it will rise naturally. This will draw out indoor air through the bottom vent.
Fig. 5 is not from the patent; I added it myself. This may be useful on a sunny day when the indoors is fine but the solar air heater is heating up the wall. Since hot air rises, having both vents open to the outdoors means there'll be a draft circulating air in the heater, taking heat from the absorber and making the heater cooler against the wall than it otherwise would be.
Troubleshooting - What if your room isn't heating up?
One possibilty is that your absorber is heating up plenty but you're not moving enough air past it fast enough to take up that heat. Here are some possibilities as to what's wrong:
- The path for your air to flow through is so constricting that the air is having trouble moving. With a backpass type heater the channel behind the absorber may be too narrow. Similarly for the areas in front or behind the screen in a matrix heater. Alternatively, the pipes feeding or taking air away from the heater may be too small or convoluted.
- Your fan/blower may be undersized.
Other possibilities are as follows:
- The glazing (if it has glazing) is not letting enough sunlight through (too low a transmissivity, see above).
- Cold outside air is stealing the heat from your absorber (meaning you don't have glazing, the absorber is in contact with outside air).
- Cold air or coldness is getting into your unit (leaks in the box or poor insulation).
- Your absorber is not a very good one (too low absorptivity).
On the other hand everything may be just fine except that your solar air heater just isn't big enough for your needs. You need a bigger absorber to capture more energy from the sun and produce more heat. It's like having the most efficient air conditioner in the world but if it's too small for the room it's in then your room just won't get cool. Same problem.
Using temperature sensors
Let's say you do have a solar air heater that can heat enough air for your needs, and perhaps sometimes too much. You need a way to stop heating the air if your room is cool enough. In that case you need some temperature sensors and some electrical experience. You really need at least two temperature sensors.
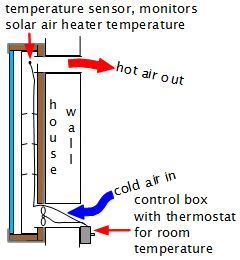
One of them would be a regular thermostat available at hardware stores. This would monitor the temperature in your room and turn the solar air heater's fan on when the room is too cold and turn it off when the temperature is just right.
But what if the room is cold and it's cloudy (or nighttime!) ourdoors. The solar air heater may not have any heat for you. This isn't like a natural gas or electric heater where the necessary energy is always available. This is where the second temperature sensor comes in. The second temperature sensor is inside the solar air heater and monitors the temperature of the air there. If the room thermometer says that the room is too cold, it will ask the temperature sensor in the solar air heater if there is any hot air available. If there is, the temperature sensor will allow the fan to turn on. If there is not, it will prevent the fan from turning on. The temperature sensor in the solar air heat basically has a veto over the room thermometer.
A good type of sensor to use inside the solar air heater if you are using the above mentioned circuit algorithm is a bimetallic snap disk (or disc) type thermal switch. Get the kind that closes the switch when the temperature is above a certain amount (e.g. 30C (86F)) and opens when it goes below a lower temperature. I found some cheap ones in a local electronics store for $5CDN each. A higher quality one would cost more of course. See here for more details, videos and circuits that use bimetallic snap disk controllers and thermostats.
When building your solar air heater, you may want to do some testing and fine tuning. For this you would want to embed thermometers in your solar air heater. Sometimes the thermometer can be in a location that's visible from the outside but sometimes it's embedded deep in the bowls of your solar air heater making it hard to know what the temperature is. A remote thermometer can be handy for this. These come as two separate pieces, an electronic thermometer and a display piece. Some products have these two pieces communicate via radio and some use a long connecting wire.
References:
1. STT 100: Solar Domestic Hot Water Installation - Fundamentals.
Canadian Solar Industries Association,
Version 1.4, October 2005, pg. 15.
2. Ibid, pg. 27.
