DIY laser communicator
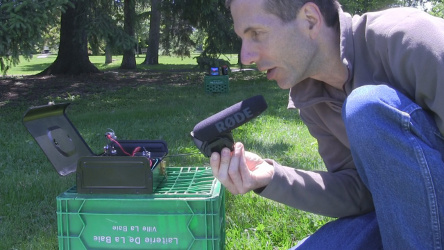
This is a relatively easy to make laser communicator which allows you to talk over a distance using a laser on one end and a solar cell on the other end, along with a few extra parts. The receiving end can instead be a photoresistor, photodiode or a number of other things but I use a solar cell here because it's a larger target to hit.
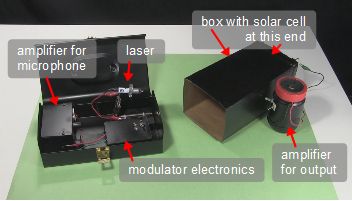
I also got very fancy in packaging everything up in a nice fashion, but you can throw it all together in any way that works for you.
You can see a video of it in action below.
How to make the laser communicator
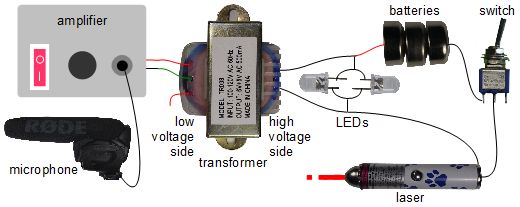
Here's the circuit diagram for the laser communicator. Simpler ones can be made but the sound you get on the receiving side may not be as good.
Parts list (see below for more information):
- amplifier - This can be a commercially made one or a homemade one like mine. For this project I changed a bit by adding a stereo audio jack socket as I talk about below.
- transformer - I used a doorbell transformer available from places that sell parts for household wiring. An audio transformer would be ideal. Most any step-up transformer will give some results.
- 2 white LEDs
- Laser - I used a pet toy laser from a dollar store.
- Batteries - These come with the laser.
- On/off switch
The LEDs are there to protect the laser from receiving too much current. A high enough voltage will result in too much current flowing through the laser, damaging it. Instead, when the voltage is high enough, the LEDs will start conducting, causing some of the current to bypass the laser, protecting it. Note that the LEDs are connected in opposite ways from each other. One conducts across the circuit in one direction and the other in the other direction.
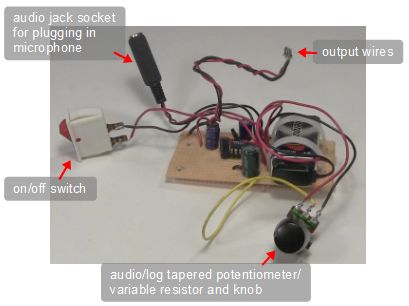
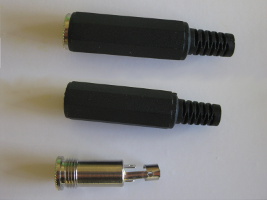
You can buy small amplifiers but I had the parts to make my own. They're the same amplifiers that I made originally for use with my crystal radios. The photo below shows what it looked like before I put it in the box. Notice that I connected up a female stereo audio jack socket for plugging a microphone or other input device into, though I used only the common connection and one of the other two sides since I didn't really have stereo. I bought my female audio socket from a local electronics store but you can For the output I just left two wires to be wired up to things directly since I wouldn't need a speaker in this case. For the volume control I used an audio, or log, tapered potentiometer/variable resistor. A normal one will do but audio/log tapered ones make volume control easier. For more explanation about that see my page about making the amplifier and specifically the video on that page.
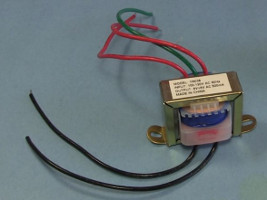
I used a doorbell transformer from an electronics/hardware store. A better transformer would be an audio transformer since it's designed for audio frequencies. Connect the low voltage side to the amplifier's output and the high voltage side to the LED's and so on as shown in the above circuit diagram.
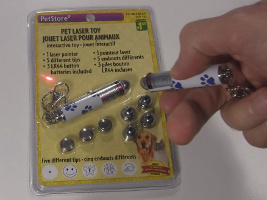
The laser is a cheap one from a dollar store and in this case is a pet toy laser, though you can find the same cheap lasers for other purposes. It's the same laser I installed in my TIE fighter and Star Trek Enterprise models.
Video - How to Make a Laser Communicator (to Solar Cell)
Here's my video that goes through the steps I used to make this laser communicator.
How to make the receiver side
The receiver side is very simple. All you need is a longish box, a solar cell, a capacitor of around 22 nanofarads (0.022 microfarads), some wiring and an amplifier. Again, I used my homemade amplifier for this but you can also buy small amplifiers.
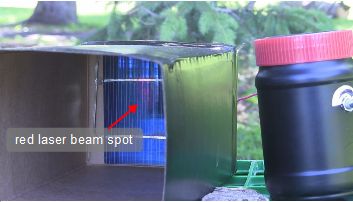
The solar cell is mounted first on a thick piece of cardboard as shown below. The ends are cut from a longish box and the box is lowered down onto the thick cardboard with the solar cell facing into the box and taped in place. I then painted the box black as a finishing touch. Also shown below, the solar cell's leads are left hanging out the back. The 22 nanofarad capacitor is connected to one lead with the other end of the capacitor connected via a wire to the amplifier. The other lead is connected to the other side of the amplifier.
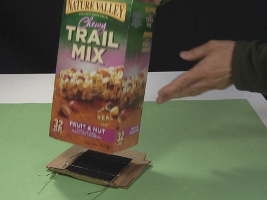
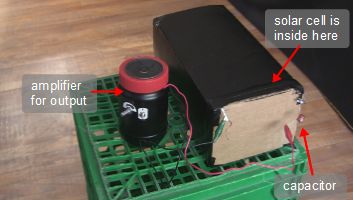
The circuit may be slightly different but you can use a photoresistor, photodiode or a number of other things instead of the solar cell. I like the solar cell because it makes for a larger target. The light from the cheap laser I used spreads out more quickly than that of a more expensive laser and so even at a 20 foot/6 meter distance the spot it makes is quite large as you can see from the photos above. A photoresistor or photodiode is much smaller and wouldn't capture as much of that light.
Video - Laser Communicator - DIY/Homemade
The following video shows this laser communicator in action.

