BB-8 (v2) remote control with HC-05 Bluethooth
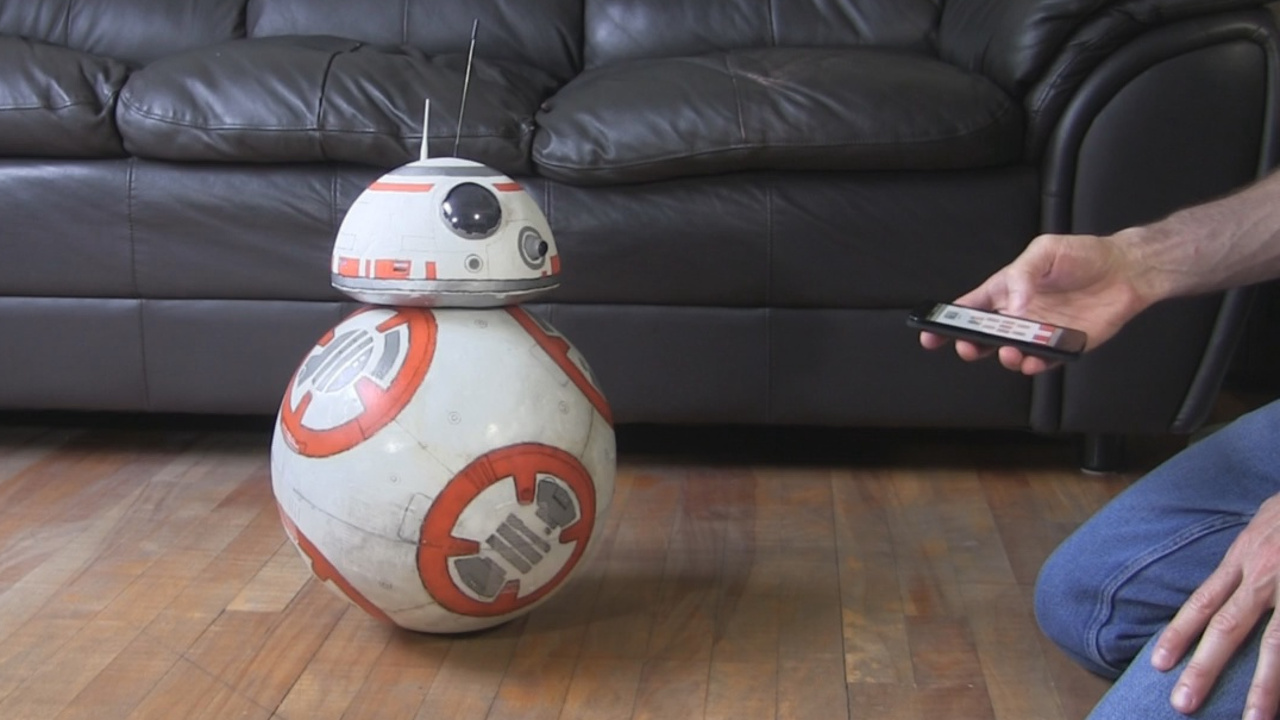
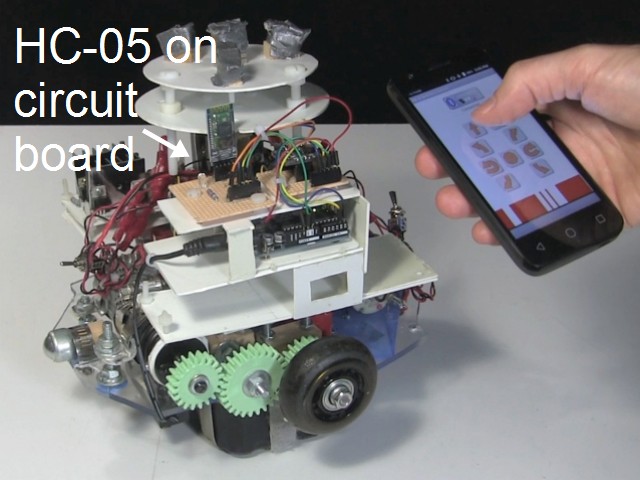
Here's how to add a remote control for BB-8 which lets you use your Android phone as the remote control and communicate with the Arduino on the BB-8 using Bluetooth and the HC-05 tranceiver board. This also talks about how to use MIT's App Inventor to create the Android app.
Previously I'd used a remote control taken from a toy truck but that took up a lot of room, had a very limited range, and required lots of batteries. The HC-05 board takes up almost no room, is lightweight, has a much longer range, and uses the Arduino for power.
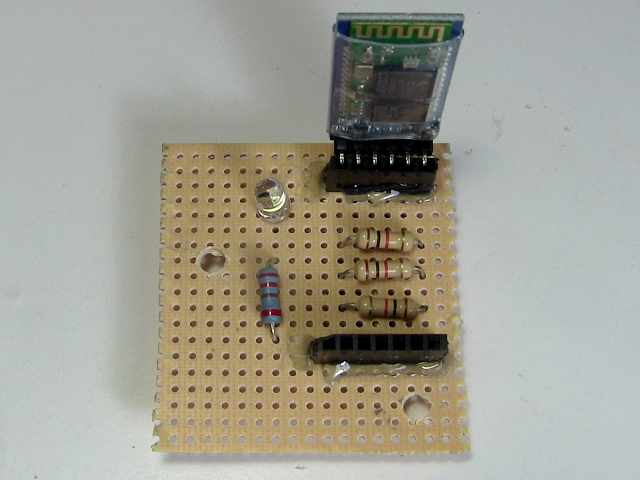
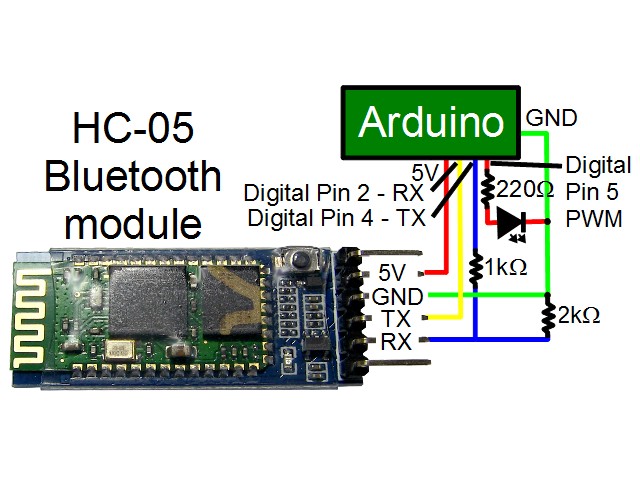
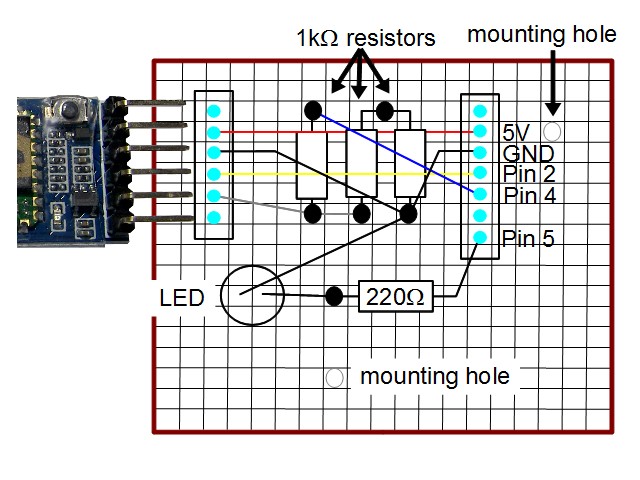
HC-05 Bluetooth circuit diagrams
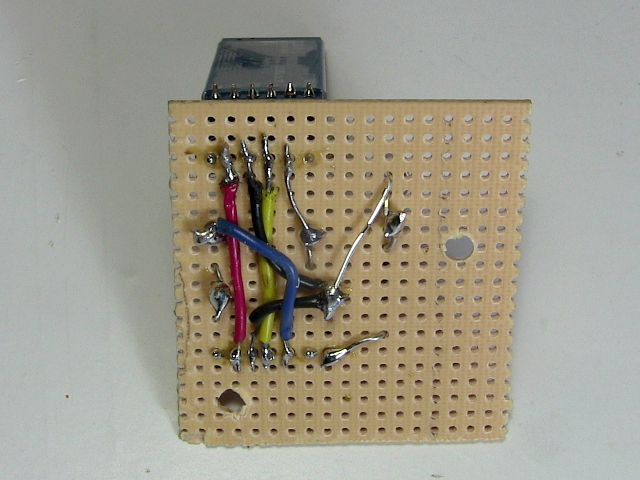
Here's the circuit diagram, and the diagram for how I put it on the perfboard. Note that I didn't have a 2 kilohm resistor so I used 2 1 kilohm resistors in series instead. I'm using the Arduino software serial library on digital pins 2 and 4 to communicate between the HC-05 and the Arduino. That leaves the hardware serial available for other uses, such as debugging.
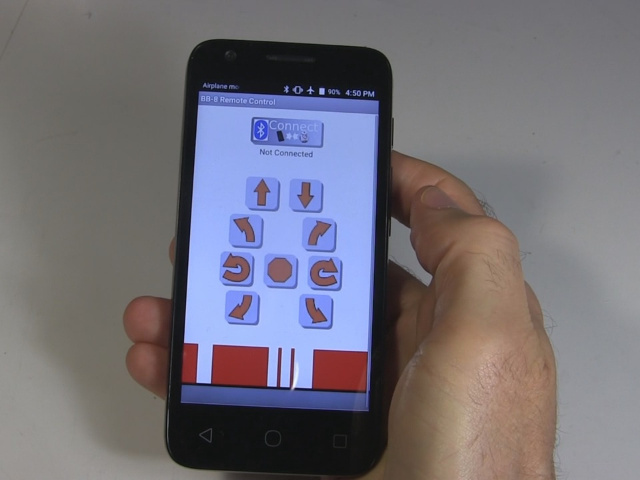
The Android app written with MIT's App Inventor
The Android phone app was written using MIT's App Inventor. The video below walks you through it. The project file, the finished app and a BB-8 icon for the phone are all here for download. The project file can be imported into the App Inventor.
BB8_remote.aia - 154KB, MIT App Inventor project file
BB8_remote.apk - 1.64MB, BB-8 remote control app for the Android phone
bb-8_v2_app_icon.png - 9.16KB, BB-8 icon for the Android phone
HC-05 Arduino Uno source code
I wired up the HC-05 to communcate with the Arduino Uno using the software serial library. Here's the Arduino sketch (source code) for receiving the commands and controlling the motors.
/* BB-8 (v2) Arduino code May 22, 2017 - First version using the HC-05 Bluetooth tranceiver board as the remote control receiver and a mobile phone with a custom app as the remote control transmiter. Full details about this BB-8 droid can be found at: http://rimstar.org/science_electronics_projects/bb-8_star_wars_droid_v2.htm Drive motor circuits -------------------- The two motors are driven independently as what's called a tank or differential drive. Each one can turn in two directions. Since it's a tank/differential drive, to go forward one motor must turn clockwise while the other motor turns counterclockwise. That makes the wheels both turn in the same direction when viewed from above. To make is spin around on the spot while remaining stationary, both motors must turn clockwise to spin in one direction or counterclockwise to spin in the opposite direction. That makes the wheels turn in opposite directions when viewed from above. Just which direction is called foward and which is reverse is chosen arbitratily since the BB-8 doesn't really have a forward or reverse direction (there's a piece of tape with "FWD" on one end of the drive plate to indicate the arbitrarly selected forward end). For this implementation, the remote control is done using an Android phone with a DIY Android app. It uses Bluetooth to communicate with an HC-05 Bluetooth tranceiver board which is wired up to the Arduino. The HC-05 communicates with the Arduino over those wires using the software serial library. That keeps the hardware serial available for debugging purposes if needed. The HC05_CMD_* values below are the one byte data that the Android app sends to the HC-05 and that the Arduino processes. Also, for this implementation, an LED is turned on while the motors are running and off when the motor is stopped. If the motors aren't turning when they're supposed to but the LED is on then this indicates that the problem isn't with the communication. Of it the LED is off when it's supposed to be on, then this indicates that the problem is with the communication. The two motors are then controlled using two H bridge circuits. With the DIY H bridge circuits for this implementation, controlling each H bridge circuit is done by the Arduino by turning on and off transistors using digital pins. There are two transistors for each H bridge, one for each direction the motor can turn. The motors each can turn counter clockwise (CCW) or clockwise (CW) depending on which transistor is turned on. Pulse Width Modulation (PWM) is done to these pins for speed control. The variables bridge1PWMduty, for motor 1, and bridge2PWMduty, for motor 2, have the PWM values. 0 turns the transistor/motor off. The pins are: bridge1CWPin - digital pin for motor 1 clockwise bridge1CCWPin - digital pin for motor 1 counter clockwise bridge2CWPin - digital pin for motor 2 clockwise bridge2CCWPin - digital pin for motor 2 counter clockwise */ #include// We're using software serieal because we're saving the digital pins 0 (RX) and 1 (TX) // for the serial console for debugging. They're common with the USB serial. #define HC05_TX 2 // this is digital pin for the HC-05's TX pin, on the Arduino side it's RX #define HC05_RX 4 // this is digital pin for the HC-05's RX pin, on the Arduino side it's TX SoftwareSerial hc05_serial = SoftwareSerial(HC05_TX, HC05_RX); // HC05_CMD_* are the commands that the mobile phone app transmits. It sends 1 byte messages, // containing the values below. Make sure the values match what the app transmits. #define HC05_CMD_FORWARD 1 #define HC05_CMD_BACKWARD 2 #define HC05_CMD_SPINCCW 3 #define HC05_CMD_SPINCW 4 #define HC05_CMD_STOP 5 #define HC05_CMD_FORWARDLEFT 6 #define HC05_CMD_FORWARDRIGHT 7 #define HC05_CMD_BACKWARDLEFT 8 #define HC05_CMD_BACKWARDRIGHT 9 int hc05_debugLEDPin = 5; // used to turn on and off an LED for diagnostic purposes // Stuff for what's considered the left wheel and the motor mounted on the front. int bridge1CWPin = 9; // digital pin 9 for PWM int bridge1CCWPin = 10; // digital pin 10 for PWM int bridge1PWMduty = 56; // duty cycle for H bridge 1 // (a value of 25 blew a 1 amp fuse and // 48 blew a 3 amp fuse but not a 5 amp fuse.) // Stuff for what's considered the right wheel and the motor mounted on the back. int bridge2CWPin = 3; // digital pin 3 for PWM int bridge2CCWPin = 11; // digital pin 11 for PWM int bridge2PWMduty = 44; // duty cycle for H bridge 2 // (a value of 12 blew a 1 amp fuse and // 48 blew a 3 amp fuse but not a 5 amp fuse.) void turnMotor1Off() { analogWrite(bridge1CWPin, 0); // off analogWrite(bridge1CCWPin, 0); // off } void turnMotor1CW() { analogWrite(bridge1CWPin, bridge1PWMduty); // PWM duty cycle analogWrite(bridge1CCWPin, 0); // off } void turnMotor1CCW() { analogWrite(bridge1CWPin, 0); // off analogWrite(bridge1CCWPin, bridge1PWMduty); // PWM duty cycle } void turnMotor2Off() { analogWrite(bridge2CWPin, 0); // off analogWrite(bridge2CCWPin, 0); // off } void turnMotor2CW() { analogWrite(bridge2CWPin, bridge2PWMduty); // PWM duty cycle analogWrite(bridge2CCWPin, 0); // off } void turnMotor2CCW() { analogWrite(bridge2CWPin, 0); // off analogWrite(bridge2CCWPin, bridge2PWMduty); // PWM duty cycle } void setup() { pinMode(bridge1CWPin, OUTPUT); pinMode(bridge1CCWPin, OUTPUT); pinMode(bridge2CWPin, OUTPUT); pinMode(bridge2CCWPin, OUTPUT); turnMotor1Off(); turnMotor2Off(); pinMode(hc05_debugLEDPin, OUTPUT); hc05_serial.begin(9600); // default baud rate for the Bluetooth module //Serial.begin(9600); // for sending debugging messages to the Arduino IDE's Serial Monitor } void loop() { int hc05_data; if (hc05_serial.available() > 0) { // did we receive a command from the remote control? hc05_data = hc05_serial.read(); // get the command //Serial.print("hc05_data: "); // write debugging data to the Arduino IDE's Serial Monitor //Serial.println(hc05_data); switch (hc05_data) { case HC05_CMD_FORWARD: //hc05_serial.println("Forward"); <= sending back to the mobile phone app, not implemented analogWrite(hc05_debugLEDPin, 20); turnMotor1CCW(); turnMotor2CW(); break; case HC05_CMD_BACKWARD: analogWrite(hc05_debugLEDPin, 20); turnMotor1CW(); turnMotor2CCW(); break; case HC05_CMD_SPINCCW: analogWrite(hc05_debugLEDPin, 20); turnMotor1CW(); turnMotor2CW(); break; case HC05_CMD_SPINCW: analogWrite(hc05_debugLEDPin, 20); turnMotor1CCW(); turnMotor2CCW(); break; case HC05_CMD_STOP: analogWrite(hc05_debugLEDPin, 0); turnMotor1Off(); turnMotor2Off(); break; case HC05_CMD_FORWARDLEFT: analogWrite(hc05_debugLEDPin, 20); turnMotor1Off(); turnMotor2CW(); break; case HC05_CMD_FORWARDRIGHT: analogWrite(hc05_debugLEDPin, 20); turnMotor1CCW(); turnMotor2Off(); break; case HC05_CMD_BACKWARDLEFT: analogWrite(hc05_debugLEDPin, 20); turnMotor1Off(); turnMotor2CCW(); break; case HC05_CMD_BACKWARDRIGHT: analogWrite(hc05_debugLEDPin, 20); turnMotor1CW(); turnMotor2Off(); break; } } }
Video - Making BB-8 (v2) - Adding HC-05 Bluetooth RC - Part 6
This video walks through the HC-05's circuit, shows how to write the Android phone app using MIT's App Inventor, walks through the Arduino code, shows how to connect the HC-05 circuit to the Arduino, and demonstrates the BB-8 in action.
More topics
Renewable Energy
Science/Electronics
Projects
Build Van de Graaff
Wimshurst machine
Kelvin water dropper
Electroscope
Corona motors
Ball bearing motor
Crystal radios
AM Radio Transmitter
Fresnel lens
Electrets
Piezoelectric
Electrolytic capacitor
Joule thief
Peltier/Seebeck effect
Franklins bell
Can Stirling
Big Stirling
555 timer music
TEA laser
Laser diode fun
How Ion Prop. Works
Lifter/ionocraft
Star Trek Enterprise
Smoke precipitator
Moving with sound
Straw music instruments
Gravity light - DIY
Nitinol wire
Pyramid hologram
Arduino speech/Talkie
Arduino controlled Skull
Pinhole camera
Wireless electricity
Fly swatter powered CFL
Chlorophyll/fluorescence
Small SG Tesla coil
Photophone
Laser communicator
Hero's steam engine
Alcohol stove
Sunflower heat engine
BB-8 Droid
BB-8 Droid (v1)
BB-8 Droid (v2)
Parts list/BOM
Drive system (v2)
Dome/head (v2)
Drive electronics (v2)
Bluetooth RC
Old RC to ArduinoFiberglassing globe
Gryo stabilization
Detailing & painting
Dimensions
Ball cyclotron
Atmos. electricity
Photoelectric effect
Bottle rocket
Neural networks
Ornithopter
Curie temp. experiment
Lightning in bottle
Gyroscope - vinyl records
Raspberry Pi
Pi to Arduino
Pepper's ghost phone
Potato chip circuit
Ion wind rotor
LED flashlight
DIY coil gun
Electrolyzer
Zoetrope
Izzy - AI Robot
Resources
Power supplies
HV Probes/measuring
Miscellaneous
Efficiency & Conservation
Composting
Food
Non-conv. Energy
Non-conv. Propulsion
Space
Stories
